Get to Know MailMaven
The Settings Window
The Settings window (MailMaven > Settings) contains hundreds of options that let you customize nearly every aspect of MailMaven’s behavior. It’s organized into seven main panes, some with multiple tabs to organize settings into subgroups.
The majority of settings are self-explanatory. This page provides an overview of each pane and tab, calling out a handful of key settings and providing further guidance in a few areas that may not be obvious.
General Settings
The General pane contains settings that affect the MailMaven app as a whole.
Application Tab
On the Application tab, you can change the overall color scheme from purple to something else using the Theme Color pop-up menu. You can also set your Mac’s default email app (to MailMaven or something else), change the frequency of checking for new messages and synchronizing all your mailboxes, and set the behavior of the Refresh Mail button.
Keystrokes Tab
The Keystrokes tab lets you configure keyboard shortcuts for dozens of common activities. At the top of the tab, you can select Maven (to use MailMaven’s defaults), Gmail (to use Gmail’s defaults, where applicable), or Custom (to set your own, with MailMaven’s defaults prefilled for you. With Custom selected, click in a field and press the keyboard shortcut you want to use for that action.
Notification & Badges Tab
On this tab, configure how you want MailMaven to notify you about new incoming messages, messages to which Keystroke Rules have been applied, and messages with review dates (see Review Date), as well as the appearance and behavior of the unread message badges on MailMaven’s Dock icon and menu bar icon.
Accounts Settings
The Accounts pane is where you configure each of the email accounts you want to use with MailMaven. It’s also where you can optionally set up a sync profile that enables MailMaven to sync the tags for all your messages with any other Macs you use.
Mail Accounts Tab
To add or configure an email account, go to the Mail Accounts tab. MailMaven supports all IMAP accounts (including Proton Mail accounts via the Proton Mail Bridge app), as well as iCloud, Gmail/Google Workplace, Microsoft Exchange/Office 365/Outlook, Yahoo!/AOL and POP.
To add a new account:
- Click the plus
 icon at the bottom of the account list.
 - Enter the account’s email address and your name (that is, the name you want to appear in the From line of messages sent from this account). Click Continue.
- On the next screen, confirm (and edit if necessary) your name and email address, and optionally edit the account name (the way the account appears in MailMaven).
MailMaven automatically chooses a color for your account, which is used throughout the app to help you distinguish one account from another. If you don’t like the preselected color, click the color swatch and select a different one.
If MailMaven has not automatically selected the correct account type, click the gear
 icon, click Override Account Type, choose the account type you want to use, and click OK.
 - Depending on the account type, you may then see:
- A password field. Fill in your password for that account and click Authorize. (For iCloud accounts, you’ll need a special app-specific password; see App-Specific Passwords, below.)
- An Authorize button only. Click this and follow the steps to authenticate (see About MailMaven and OAuth, just ahead).
- MailMaven attempts to figure out which mailboxes on the server should be used for the special mailboxes Drafts, Sent, Trash, Archive, and Junk, as shown in the Special Mailboxes section. To use a different mailbox for any of these purposes, choose it from the appropriate pop-up menu.
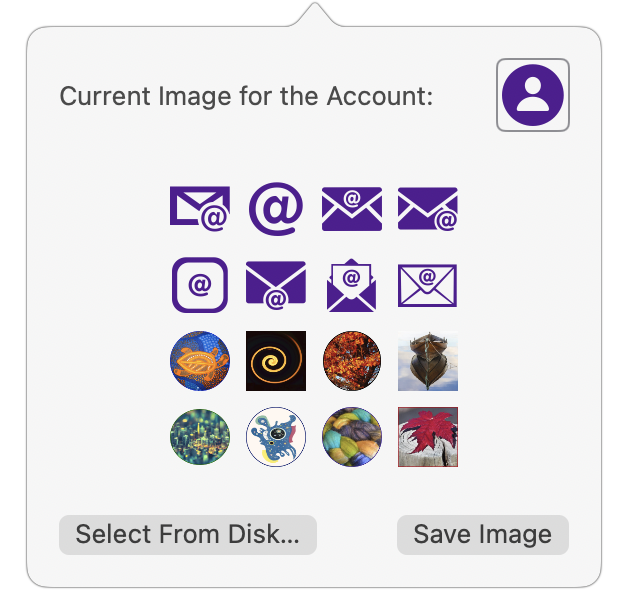
- MailMaven also assigns an icon to each account, which is branded in the case of major providers such as Gmail, iCloud, and Exchange, but a generic silhouette icon for regular IMAP accounts. If you prefer a different icon, click the current icon (labeled with an EDIT badge) and select a different image from those shown, or click Select From Disk and navigate to the image file of your choice.
Repeat these steps for as many accounts as you like. To change account details later, select the account
To remove an account from MailMaven, click the minus ![]() icon at the bottom of the account list.
icon at the bottom of the account list.
App-Specific Passwords
Some email providers, such as iCloud and Fastmail, employ a special security measure when accessing them from an app other than their own. Rather than using OAuth, they require an app-specific password—a special password you generate for the use of a single app.
To get an app-specific password for iCloud, do this:
- Go to account.apple.com and sign in.
- Click App-Specific Passwords.
- Click the plus
 icon.
icon. - Enter the name of the app (in this case,
MailMaven) and click Create. When prompted, confirm your identity using your Apple Account password. - Your new app-specific password for MailMaven appears on the screen. Immediately copy this and store it in a safe place, such as a password manager.
Importing from Mail
During the initial MailMaven setup process, you’re prompted to import accounts, mailboxes, and messages from Apple Mail. If you skip that for one or more accounts, or if you later want to import additional accounts or “On My Mac” mailboxes, click the Import ![]() icon at the bottom of the account list in Settings > Accounts > Mail Accounts and follow the prompts.
icon at the bottom of the account list in Settings > Accounts > Mail Accounts and follow the prompts.
Sync Profile
Tags you apply to messages (see Message Organization) are stored separately from your messages themselves in a special database on your Mac. If you use MailMaven on more than one Mac, you’ll surely want the same tags to appear in each copy. To accomplish this, MailMaven gives you the option to sync just the tag data (not message contents or headers) with your other Macs via SmallCubed’s servers. Tag data is encrypted end-to-end and can’t be read by SmallCubed.
To set this up, you first need an account called a sync profile. If you don’t already have one, go to Settings > Accounts > Sync Profile, click Create, and follow the prompts to sign up with an email address and password.
If you already have a sync profile, go to Settings > Accounts > Sync Profile and click Link. Choose the appropriate email address from the pop-up menu, enter your profile password, and click Use Existing Profile.
Once you’ve set up and linked a profile, select the checkboxes for each account whose tag data you want to sync. (On any given Mac, even when signed in, you can choose to sync tag data from any, all, or none of your email accounts.)
Repeat this procedure on each of your Macs.
View Settings
On the View pane are settings related to how the viewer window, messages, conversations, and other elements of the user interface appear and behave.
Appearance Tab
The Appearance tab has five subsections:
- Viewer Layout: Select whether Snippets or Table is the default view, adjust details of the appearance for each, and select elements to show, hide, or highlight.
- Search: Set the default search type (All Words by default, but you may prefer Any Word) and the default scope (All Messages by default, but you can choose a more restricted scope from the pop-up menu).
- List View Email Addresses: Configure the way you want addresses and recipient markers to appear in message lists.
- Conversation Panel: Optionally check either or both of these boxes to show the Conversation panel when you select any message that’s part of a conversation and hide it when you no longer have such a message selected.
- Mailbox/Account Information: Choose whether to show the account color, icon, and name next to the subjects in message lists.
Message Display Tab
Controls related specifically to how individual messages appear are on this tab, divided as follows:
- Headers: Adjust the appearance of the Message Header area.
- Fonts & Zoom: Set the default font and size for both rich text and plain text messages, and the default zoom level.
- Quoted Content: Set colors and appearance of quoted text in replies.
- Images: Set defaults for whether and when remote media should load automatically.
- Attachments: Specify how you want various kinds of attachments to appear within a message.
- Message Action Bar: Choose where and when the Message Action Bar appears (see Basic Message Controls) and what the Action
 icon does.
Behaviors Tab
On this tab, adjust when (if at all) messages are marked as read, whether to archive sent messages, and what the Space bar does in various contexts.
Compose Settings
The Compose pane contains settings that pertain to the creation of email messages (including new messages, replies, and forwards).
Display Tab
The Display tab lets you configure a number of things about the look and behavior of messages you’re creating:
- Composition: Choose defaults for the address format, content type (rich text or plain text), font and size, and auto-save.
- Default Sender: For users with multiple email accounts, determine how MailMaven picks which address to send new messages from by default, and what the fallback address is if the default can’t be used for any reason. (Best Guess takes context into account, such as which account, mailbox, or message is selected when you reply, forward, or create a new message.)
- Outboxes: Use this pop-up menu to set when the Outbox appears.
- Delivery Options: Decide whether the Delivery Options Bar is visible by default, and what the default settings are for several delivery options.
Signatures Tab
Set up signatures here, as explained fully in Adding a Signature.
Templates Tab
On this tab, create and edit templates as described in Using Templates.
Tag Settings
Settings for the many ways in which MailMaven can tag messages are on the Tag pane. Although you can use most of the tagging features without any configuration at all, this pane lets you customize many behaviors to your exact preferences.
General Tab
On the General tab, select which types of tags appear in the Tag Window (all are enabled by default) and whether replies and forwarded messages inherit keywords or projects from the original message (both are turned off by default).
Keywords Tab
You can add keyword tags on the fly to any message (see Keywords), and, by default MailMaven remembers previously used keywords so it can autofill them as you type matching characters. If you don’t want MailMaven to do this, go to the Keywords tab and deselect “Add New Keywords to Preferred List as.” You can also set the number of recent keywords to show and what their sort order should be.
In the Keywords table, you can create new keywords you haven’t yet used, edit or delete existing keywords, and (for Gmail accounts) mute individual keywords. For other Gmail-specific settings on this tab, refer to Tags and Gmail Labels.
Projects Tab
On the Projects tab, you can create, edit, or mute projects (see Project) and adjust a few project-related settings.
Review Tab
Settings related to Review Date tags are on the Review tab. You can configure two default review dates that appear when you tag a message, either of which can be a specific day of the week (such as the next Thursday) or a number of days (such as three days from now). You can also enable notifications when a message reaches its review date and configure Expected Reply settings.
Colors Tab
On the Colors tab, configure which colors are used with Background Color tags as well as with review dates and importance.
Process Settings
The Process Settings pane offers controls for the tools MailMaven uses to help you process messages (either automatically or manually): rules, the Action panel, QuickMove to Mailbox, QuickOpen Mailbox, and junk mail filtering.
Inbox Rules Tab
The Inbox Rules tab lets you configure rules that run automatically on each new incoming message as it’s received. See Inbox Rules for details.
Outbox Rules Tab
The Inbox Rules tab lets you configure rules that run automatically on each new outgoing message as it’s sent. See Outbox Rulesfor details.
Keystroke Rules Tab
The Keystroke Rules tab lets you configure rules that run on demand when you press a user-specified keyboard shortcut. See Keystroke Rules for details.
Message Filing Tab
The Message Filing tab lets you set up to ten mailboxes each to be used with keyboard shortcuts for QuickMove to Mailbox and QuickOpen Mailbox operations. It also offers several ways to customize the Action Panel.
Junk Tab
The Junk tab lets you configure MailMaven’s spam filtering; see Junk Mail for details.
Secure Settings
The Secure pane contains controls for configuring MailMaven to encrypt and/or digitally sign messages using PGP (or its open-source counterpart, GPG/GnuPG). For details, refer to Encrypting and Digitally Signing Messages.
The checkboxes at the top of the pane let you set defaults for encrypting and signing outgoing messages, but regardless of how you set this, you can override your choice for individual messages (see Encrypting and Digitally Signing Messages). To store decrypted copies of messages on disk (and not just in RAM), select Cache Decrypted Messages.