Get to Know MailMaven
Message Processing
When messages arrive in your inbox, you’ll (usually) want to read them (and sometimes reply to or forward them), but then what? Whether you then delete the messages, file them into a mailbox, or perform some other activities with them, the next step is to process them in some way. If you’re an Inbox Zero person, your goal may simply be to get the message out of your inbox, but whatever your approach to managing email, it’s important to be able to distinguish messages you still have to deal with in some way with those you don’t. MailMaven’s numerous processing tools can turn an otherwise tedious step into a breeze.
Of course, you can drag a message manually to another mailbox, or press the Delete key to remove it. But MailMaven lets you perform most processing actions from the keyboard if you prefer, and can automate many of them.
The three main tools available for message processing are:
- Mail Actions, which give you streamlined ways to move, copy, and tag messages
- Rules, which apply automatically to incoming and/or outgoing messages, and can also apply on demand via a keystroke
- Junk Mail filtering, using either spam headers set by your email server or external processing with SpamSieve
Mail Actions
Mail Actions enable you to process messages in various ways using a pop-up window that can be controlled entirely from the keyboard if you like. This window takes any of several different forms, depending on how you invoke it.
Action Panel
The Action panel is a list of all the other Mail Action panels you can use. If you don’t want to memorize a long list of keyboard shortcuts, you can start with just one, F1, which gives you a launching point for all the other actions. (Of course, if you do memorize the other keyboard shortcuts, you may never use the Action panel at all.)
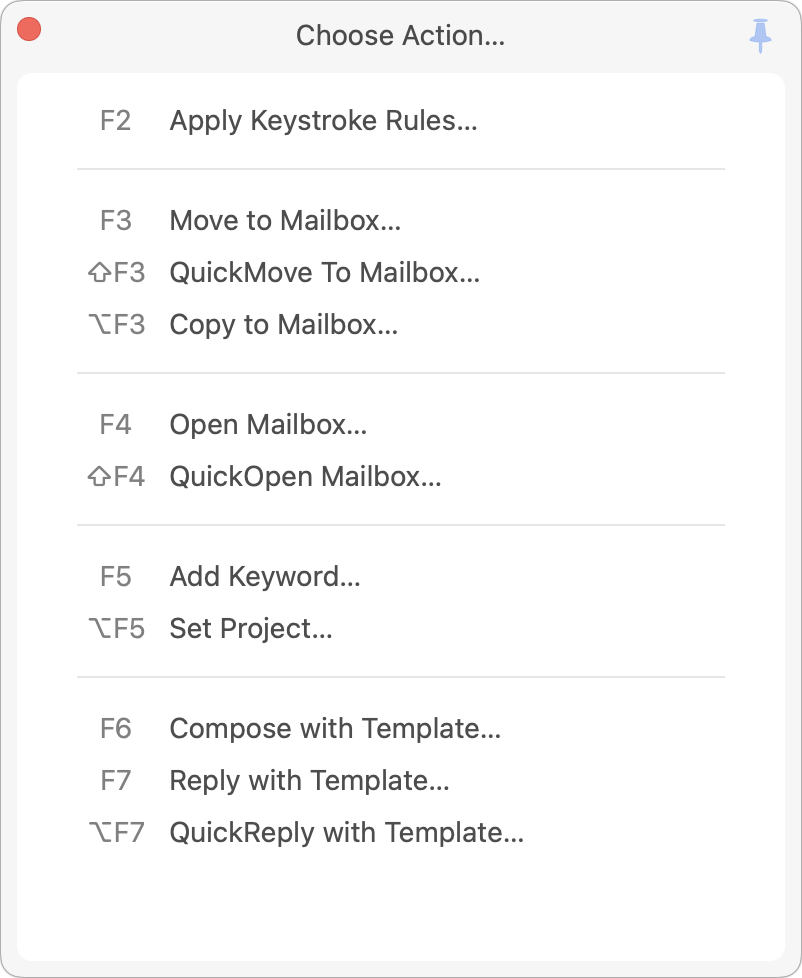
The Action panel provides shortcuts to the following:
- Apply Keystroke Rules (F2)
- Move to Mailbox (F3)
- Copy to Mailbox (Shift-F3)
- Open Mailbox (F4)
- QuickOpen Mailbox (Shift-F4)
- Add Keyword (F5)
- Set Project (Option-F5)
- Compose with Template (F6)
- Reply with Template (F7)
- QuickReply with Template (Option-F7)
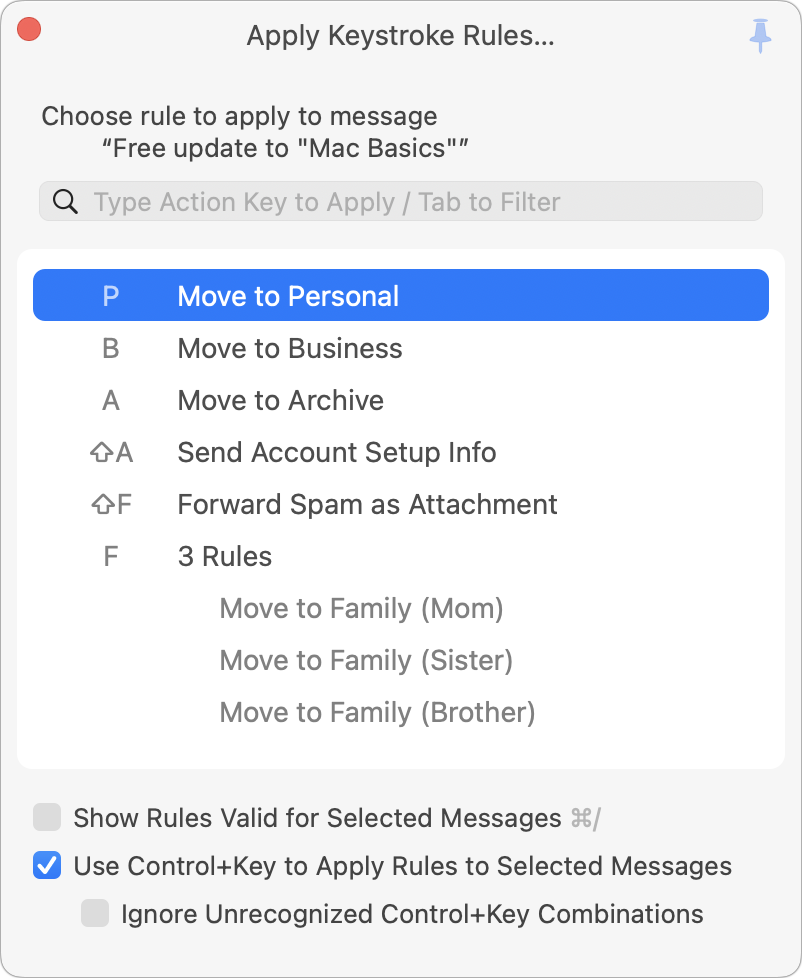
Apply Keystroke Rules
You can create any number of Keystroke Rules, which are just like inbox and outbox rules except that instead of applying automatically on incoming or outgoing messages, they apply only when you press a user-defined keyboard shortcut. If you forget which keyboard shortcuts you’ve set, you can open the Apply Keystroke Rules panel by pressing F2. Then use the arrow keys (or type in the Search field to find a rule) to select a keystroke rule and press Return to apply it.
Move to Mailbox
MailMaven lets you move any message to any mailbox quickly—in any account, no matter how deeply nested, and even if you don’t remember where that mailbox is. With one or more messages selected, press F3 to open the Move to Mailbox panel.
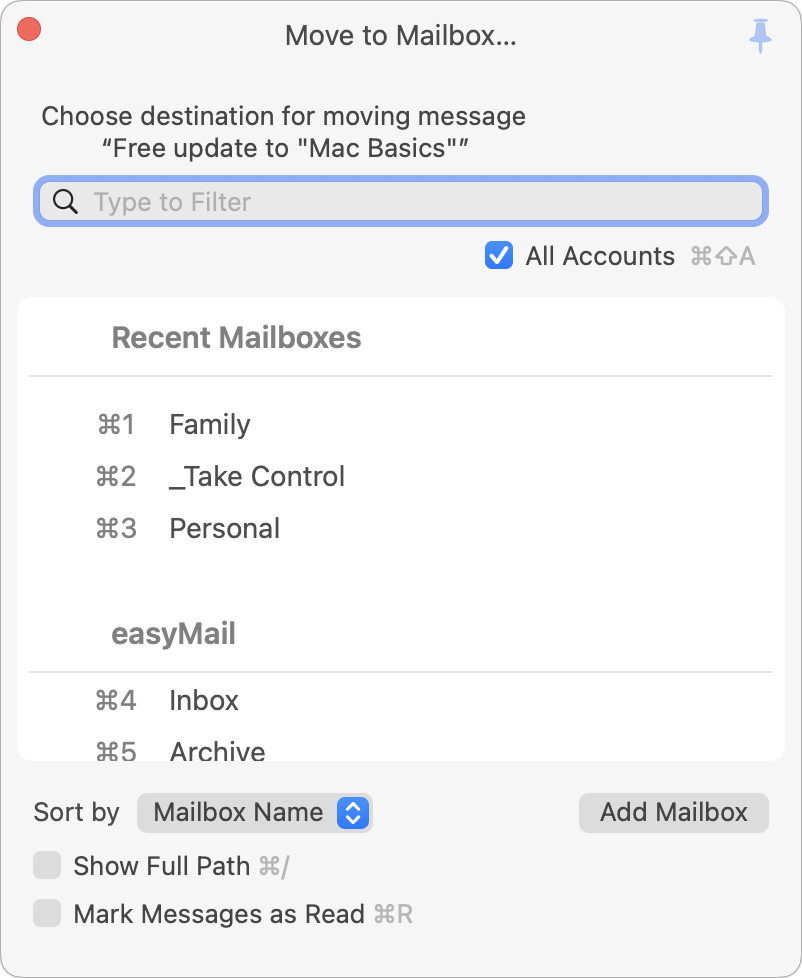
Optionally type part of the mailbox name to filter the list, then press the keyboard shortcut next to a mailbox, select it in the list using your mouse, or use the arrow keys and then press Return.
To move the selected messages to a mailbox and go to that mailbox at the same time, press Option (⌥) while selecting the mailbox, or add Option to the keyboard shortcut.
QuickMove to Mailbox
The QuickMove to Mailbox panel (Shift-F3) is like a streamlined version of the Move to Mailbox panel: it contains only the mailboxes (up to 10) you’ve designated as the ones you use most often in Settings > Process > Message Filing > QuickMove Mailboxes.
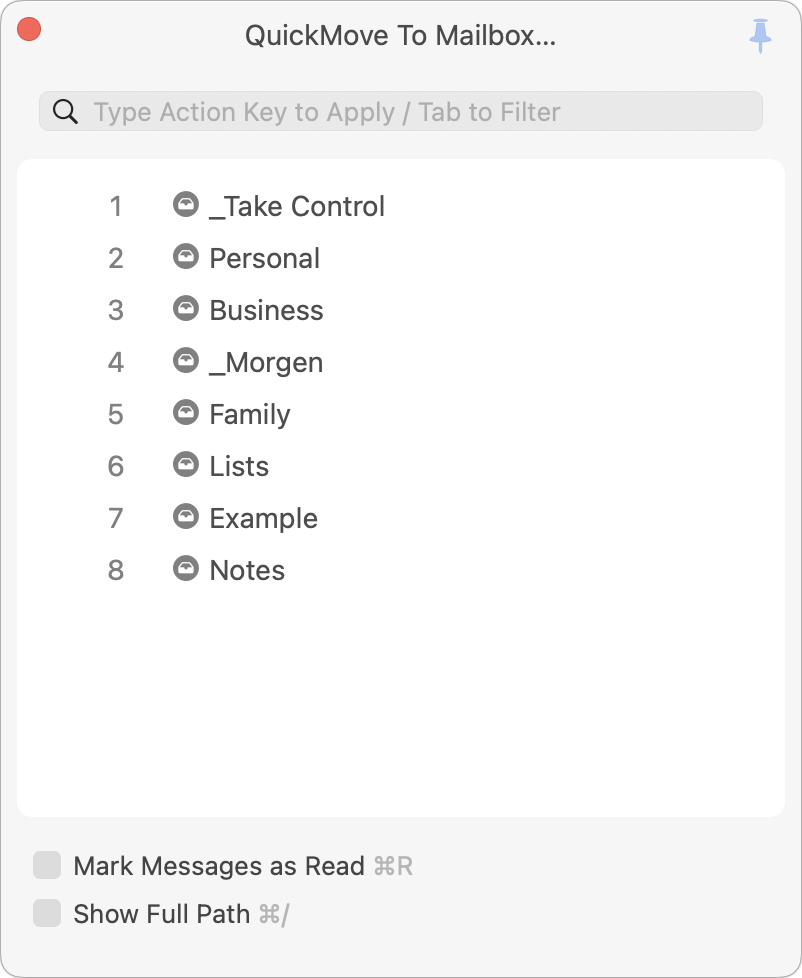
Once the QuickMove to Mailbox panel is open, you can simply press the number beside any mailbox to move the selected messages to that mailbox.
Copy to Mailbox
The Copy to Mailbox panel is just like the Move to Mailbox panel, except that it duplicates the selected messages to the destination mailbox.
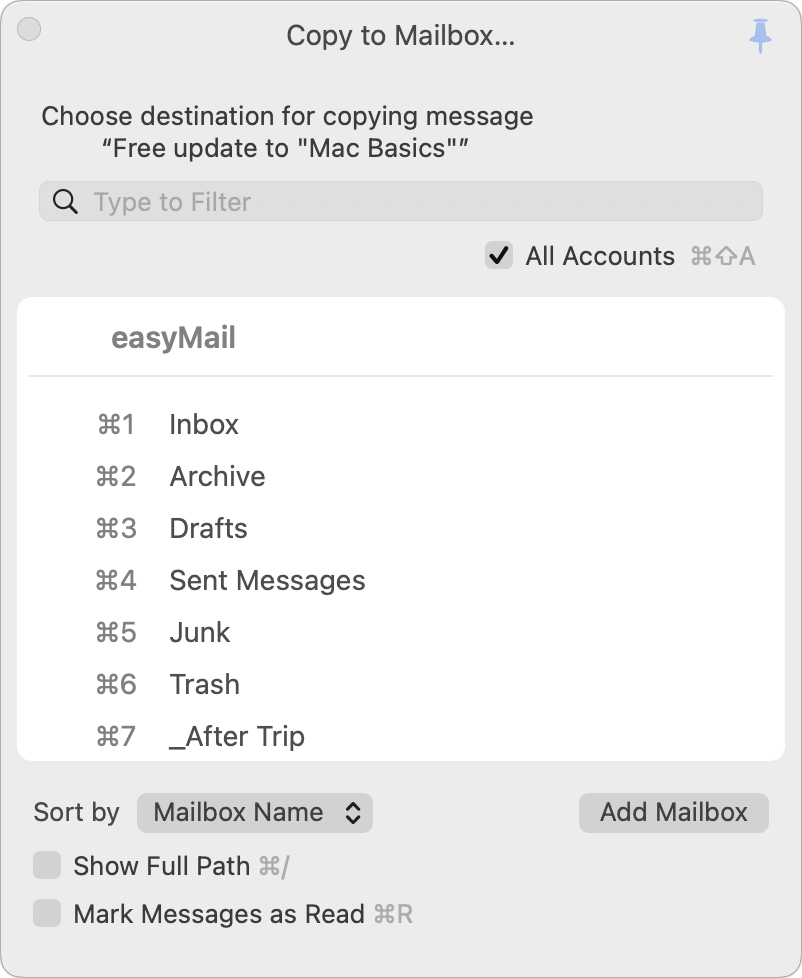
To copy the selected messages to a mailbox and go to that mailbox at the same time, press Option (⌥) while selecting the mailbox, or add Option to the keyboard shortcut.
Open Mailbox
Although you can select any mailbox in the MailMaven viewer window to display its contents, you can also open any mailbox using the Open Mailbox panel (F4).
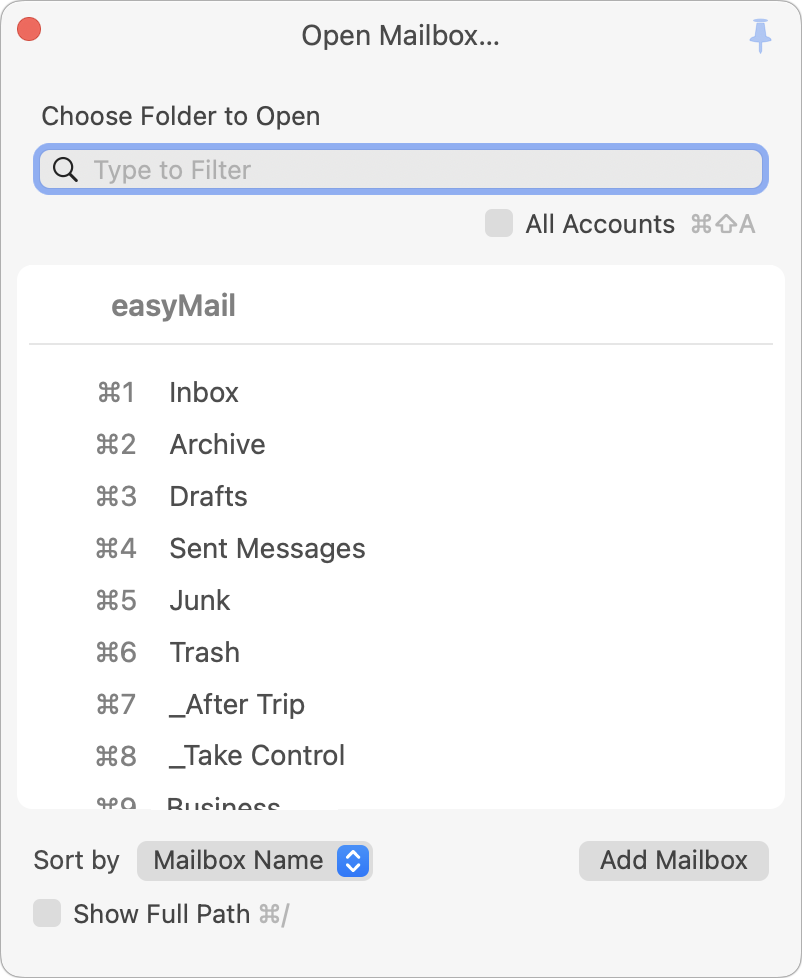
Optionally type part of the mailbox name to filter the list, then press the keyboard shortcut next to a mailbox, select it in the list using your mouse, or use the arrow keys and then press Return.
QuickOpen Mailbox
Just as QuickMove to Mailbox is a streamlined version of Move to Mailbox, QuickOpen Mailbox (Shift-F4) is a streamlined version of Open Mailbox, showing up to 10 of your favorite mailboxes as set in Settings > Process > Message Filing > QuickOpen Mailboxes.
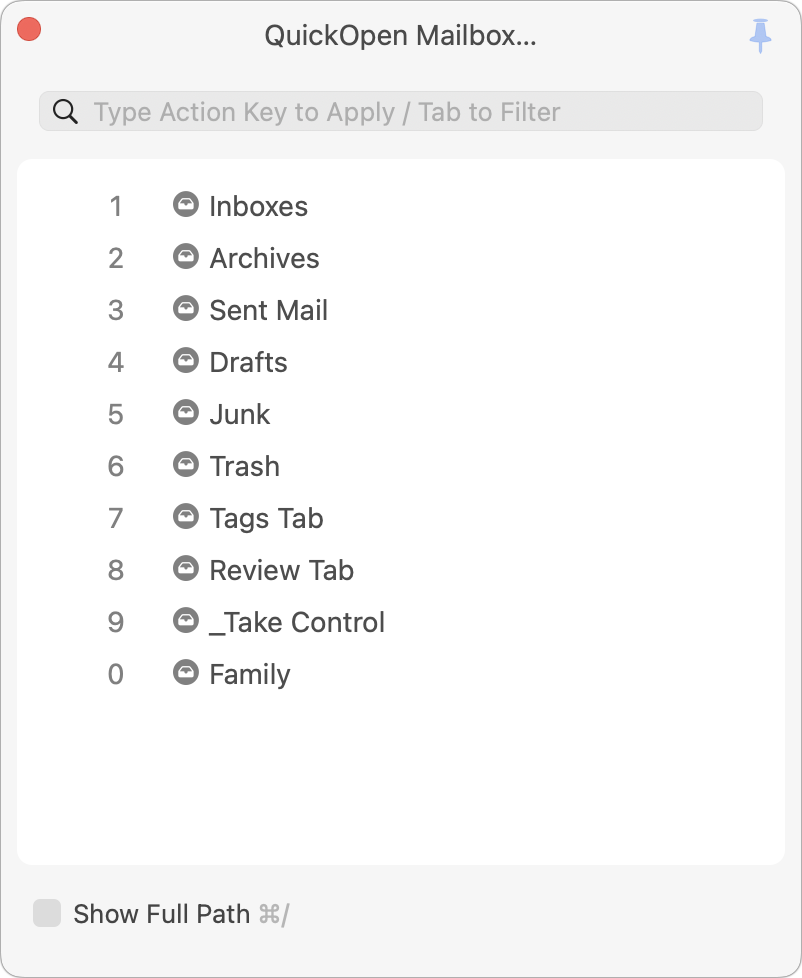
Once the QuickOpen Mailbox panel is open, you can simply press the number beside any mailbox to open that mailbox.
Add Keyword
You can add keywords to the selected message(s) in numerous ways, such as clicking the Tag Message ![]() icon, choosing Message > Set Tags, or pressing ⌃⌘T. Yet another way is to call up the Add Keyword panel by pressing F5.
icon, choosing Message > Set Tags, or pressing ⌃⌘T. Yet another way is to call up the Add Keyword panel by pressing F5.
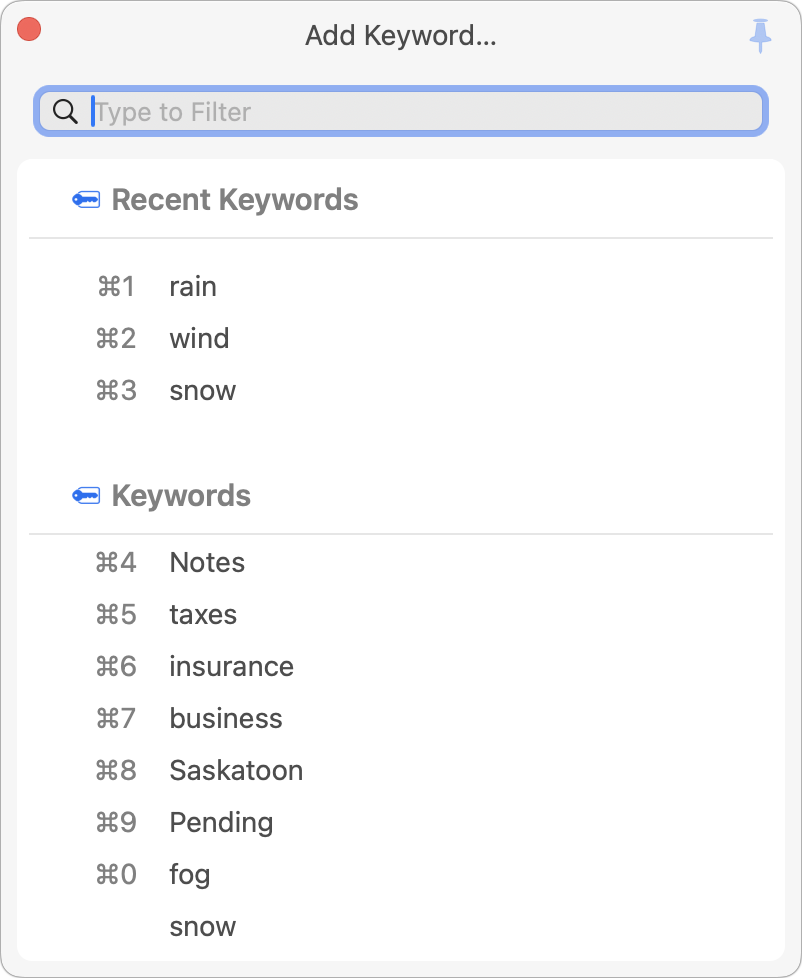
Here you can do any of the following:
- Type part of an existing keyword to filter the display, then select the one you want using the mouse, or select it using the arrow keys and press Return.
- Press the keyboard shortcut shown next to a keyword to apply it.
- Type a new keyword and press Return.
Set Project
Just like the Add Keywords panel, the Set Project panel (Option-F5) lets you add a project tag to the selected message(s).
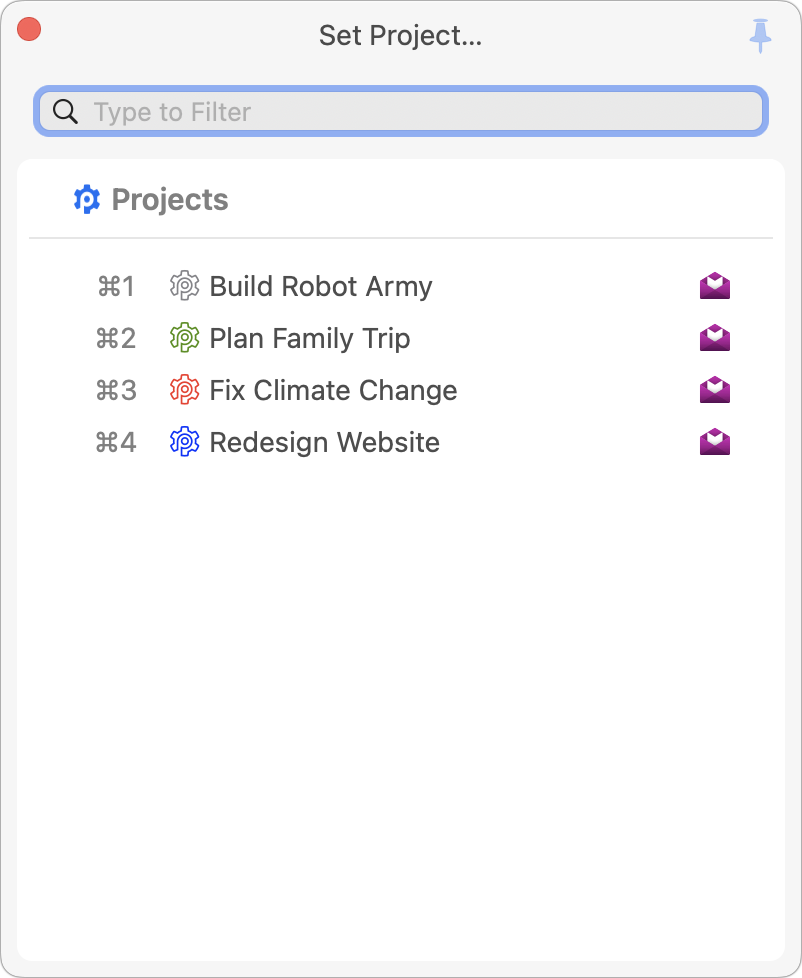
You can then:
- Type part of an existing project to filter the display, then select the one you want using the mouse, or select it using the arrow keys and press Return.
- Press the keyboard shortcut shown next to a project to apply it.
- Type a new project name and press Return.
Rules
Rules should be familiar to anyone who has used Apple Mail, Microsoft Outlook, Gmail, or other popular email apps. A rule is simply a description of what condition(s) to look for in a message (such as a particular subject or sender, or a phrase in the body of the message) and what action(s) to perform when a message matches that description (delete the message, file it in a particular mailbox, or send a boilerplate reply, say).
MailMaven’s rules offer considerably more power than Apple Mail’s, and can interact with tags and notifications in a variety of ways.
Rule Basics
The process of creating a rule is almost identical regardless of where it’s used, although a handful of conditions and actions apply only in certain contexts (for example, Junk Status doesn’t apply to outbox rules, and only keystroke rules can apply other rules as one of their actions).
To create a rule:
- Go to Settings > Process > Inbox Rules, Outbox Rules, or Keystroke Rules (depending on your needs).
- Click the plus
 icon. The new rule dialog appears.
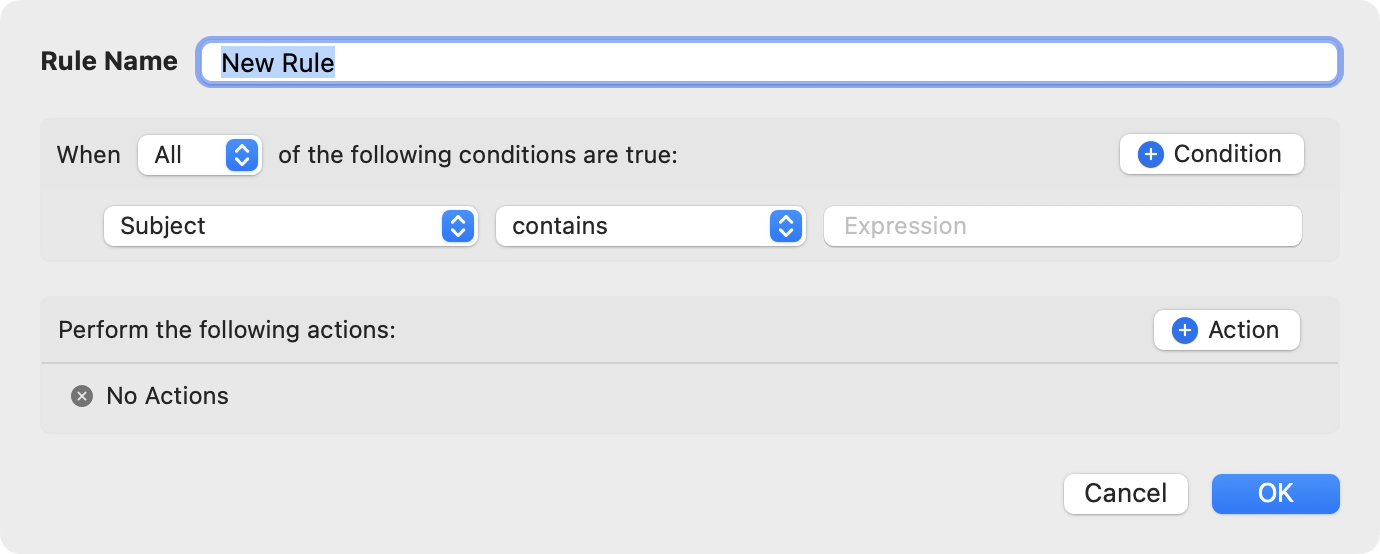
- Type in a name for your rule.
- In the top portion, which specifies what conditions to look for, choose Any or All from the pop-up menu to specify whether the rule should match a message even if only one condition is true, or whether all conditions must be true. (For messages with only one condition, this setting makes no difference.)
- Set the first condition by choosing a category (such as Subject, From, or Date Received) from the leftmost pop-up menu. Then use the remaining pop-up menu(s) or field(s) to fill in the rest of the condition, such as:
[Subject] [contains] MailMaven[From] [is] suzieq@smallcubed.com[Date Received] [is between] 3 and 7 [days] ago[# Attachments] [is at least] 5 - To add another condition, click the + Condition
 button and choose a condition from the pop-up menu. To create compound conditions (for example, to use All for the overall list of conditions but Any for a subset of conditions), choose Compound from the leftmost pop-up menu.
 - To add an action, click the + Action
 button and choose an action from the pop-up menu. As with conditions, you may have to use pop-up menus or fields to fill in the details, such as:
Add KeywordsTaxes 2025Set Importance [High]Move Message to [Archives]Set Read Status [Unread] - Repeat step 7 to add more actions, if you like.
- Click OK.
You can create as many rules as you like using this process, and you can select or deselect the Enabled checkbox to enable or disable any given rule.
Inbox Rules
Rules you create on the Inbox Rules tab (assuming their Enabled checkbox is selected) run automatically on all unread incoming messages as they appear in your inbox. Rules apply sequentially in the order shown; drag rules to change the order. If you want MailMaven to stop looking at further rules once a certain rule has matched a message, add the action Stop Applying Rules.
Outbox Rules
Rules you create on the Outbox Rules tab (assuming their Enabled checkbox is selected) run automatically on all outgoing messages as you send them. As with inbox rules, outbox rules apply sequentially in the order shown; drag rules to change the order. If you want MailMaven to stop looking at further rules once a certain rule has matched a message, add the action Stop Applying Rules.
Keystroke Rules
Rules you create on the Keystroke Rules tab (as always, assuming their Enabled checkbox is selected) run only when you press the keyboard shortcut you define. To tell MailMaven which keystroke to use, enter a character in the Key field in the upper-right corner of the rule window, with or without the modifiers Shift (⇧) and Option (⌥). Then, by default, pressing Control plus that key performs the rule.
Although you can’t change the keystroke rule modifier key to anything other Control, you can disable Control-key shortcuts by unchecking “Use Control+Key to Apply Rules to Selected Messages.” In that case, you can still apply keystroke rules by opening the Apply Keystroke Rules window (F2) and pressing the key you set.
Two additional notes about keystroke rules:
- You can use the same keystroke for multiple rules. In that case, pressing the keystroke applies the rules with that key in order.
- Keystroke rules can, in turn, run other rules, using the Apply Rule action.
Junk Mail
MailMaven does not have a built-in spam/junk mail filter, but it can use a filter on your email server, or a copy of SpamSieve running on your Mac, to categorize messages as junk. (In general, SpamSieve is far more accurate than most server-based spam filters.) Either way, you configure the way MailMaven handles spam in Settings > Process > Junk.
To rely on server-based filters that add headers indicating that a message is spam, select Evaluate Arriving Messages Using Spam Headers, and then use the pop-up menu to choose whether those messages should be moved to your Junk mailbox or kept in their original mailbox (usually the Inbox).
To use SpamSieve, instead select Evaluate Arriving Messages Using SpamSieve. For messages with a SpamSieve score of 50 or higher, choose how MailMaven handles that message using the pop-up menu; your choices are Move Message to Junk Mailbox (the default), Leave Message in Inbox, Move Message to Trash, and Delete Message Immediately. You can optionally set a different behavior for messages with a higher SpamSieve score by selecting “When SpamSieve Score Is Greater or Equal to,” entering a number (such as 75), and making a different choice from the second pop-up menu.
Having done this, you can train SpamSieve from within MailMaven: select a message and choose Message > Mark as Junk (or drag it to the Junk mailbox) to tell SpamSieve it should be considered spam; or choose Message > Mark as Not Junk (or drag it out of the Junk mailbox) to tell SpamSieve it’s not spam. (For more information, see this page on SpamSieve’s site.)
-
Message Processing