Get to Know MailMaven
Message Organization
In MailMaven, organizing messages goes far beyond filing them into mailboxes. After all, not everyone has or wants an elaborate mailbox hierarchy, and many messages might fit into several different mailboxes. To supplement filing (whether done manually or by rules), MailMaven offers extensive tagging features.
Although you may be familiar with tags from apps like the Finder and Notes, what MailMaven considers tags is much broader: not just words and phrases (Keywords) but also numerous other types of metadata, such as review dates and projects, that help you organize and track your messages. You can apply tags manually (using any of several techniques) or automatically, using rules. And you can view and use tags in many places, too—including smart mailboxes and rules.
Tagging Messages
You can tag any message in MailMaven, including outgoing messages, using a variety of techniques.
Using the Tag Window
The Tag window is a place to see all the different tag types in one place and apply as many as you like to the selected message(s). You can open the Tag window in any of these ways:
- In a message you’re composing, click the Tag Bar if it’s visible (if it’s not visible, click the Toggle Tags
 icon).
 - While viewing a message, click the Tag Message
 icon on the Message Action Bar, or, to tag all messages in a conversation, click the Tag All Messages icon on the Conversation Action Bar at the top.
 - With one or more messages selected, choose Message > Set Tags or press ⌃⌘T.
- Right-click (or Control-click) a message and choose Add Tags from the contextual menu.
Regardless of how you invoke it, the Tag window looks something like this:
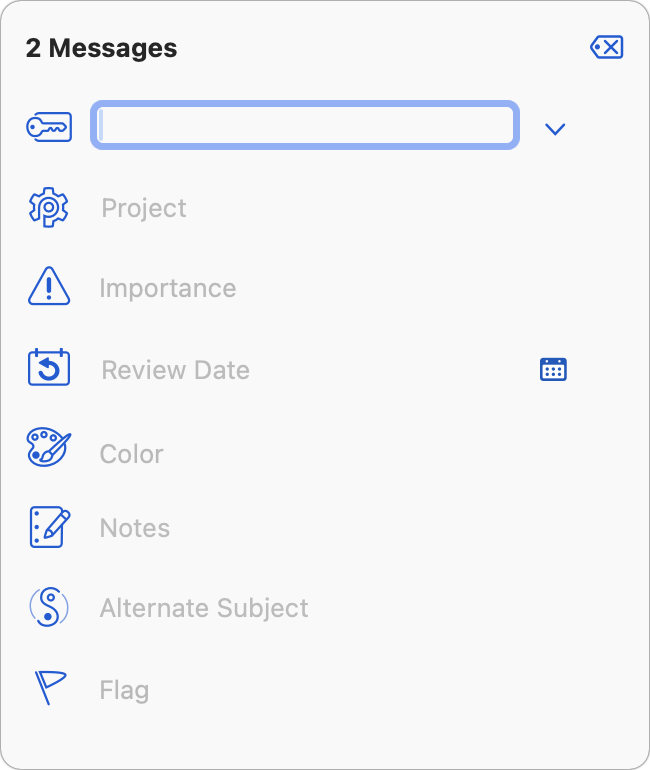
Although the Tag window initially appears as a popover, you can drag it to reposition it anywhere on the screen as a standalone window. Either way, the appearance varies slightly depending on whether you have one or more messages selected, and the window has extra controls for messages you’re composing.
There are nine different tag types, most of which can be applied in a variety of ways besides using the Tag window. The tag types, discussed individually ahead, are:
- Keywords
- Project
- Importance
- Review Date
- Expected Reply
- Background Color
- Notes
- Alternate Subject
- Flag
If you want to hide some of these tag types in the Tag window, you can deselect the corresponding checkbox in Settings > Tag > General > Tag Window.
Once you have applied whatever tags you want, you can save the tags and dismiss the popover by clicking anywhere outside it or pressing ⌘↩. To dismiss the popover without saving changes, press Esc.
Applying Tags with Rules
Any rule (inbox, outbox, or keystroke) can apply or remove tags by choosing the following actions:
- Set Color
- Set Flag
- Clear Tags
- Adopt Tags Sent With Message (not applicable to outbox rules)
- Remove Keywords
- Add Keywords
- Set Project
- Set Importance
- Set Review Date
- Set Note
See Rules for more information on creating rules.
Tag Types
Here’s a description of each of MailMaven’s nine tag types, including how to apply them and where to use them.
Keywords
A keyword is a word or phrase used to label messages. A typical use of keywords is to describe messages using one or more words that don’t necessarily appear in the message itself, such as recipe, taxes, or travel, making it easier for you to locate messages later that share that characteristic. A message can have any number of keywords.
You can add keywords in any of these ways:
- Use the Keywords section of the Tag window (see Using the Tag Window).
- Choose Message > Set Keywords (⌃⌘K).
- Right-click (or Control-click) a message and choose Set Keywords from the contextual menu.
- Open the Add Keywords panel by pressing F5, or from the Action Panel.
In any of these places, you can add a single-word keyword simply by typing it and pressing Space, Return, or comma. However, for frequently used keywords, MailMaven offers extra convenience features:
- When you use a keyword, MailMaven remembers it, so when you start typing keywords in the future, matching terms are suggested automatically.
- By default, newly added keywords appear on your Preferred List in Settings > Tag > Keywords. Preferred keywords are those you use most often, and when applying keywords, you can filter the list to show only preferred keywords if you like. To prevent newly added keywords from becoming preferred, uncheck “Add New Keywords to Preferred List as.”
- To edit preferred keywords, add new keywords (including multiple-word phrases), and set other keyword-related options, go to Settings > Tag > Keywords.
Once you’ve added one or more keywords to a message, you can see them below the message snippet in snippet view, in the message header area in the message pane/window, and in the Keywords section of the Tag Mailboxes sidebar. Keywords can also be used in defining rules and smart mailboxes, and as part of a search.
Project
A project, like a keyword, is a word or phrase used to label messages, and conceptually, they’re mostly interchangeable. However, a project is intended to mean just that: a work, school, or personal undertaking. For example, you might have a Build Robot Army project, and apply that project tag to all your correspondence on that topic. But messages within that project may also have keywords that apply to other projects, such as coding, product design, and Skynet. And, unlike keywords, a message can have only one project.
You can add a project tag in any of these ways:
- Use the Project section of the Tag window (see Using the Tag Window).
- Choose Message > Set Project (⌃⌘P).
- Right-click (or Control-click) a message and choose Set Project from the contextual menu.
- Open the Set Project panel by pressing ⌥F5, or from the Action Panel.
In any of these places, you can add a single-word project name simply by typing it and pressing Space, Return, or comma. For frequently used project names, MailMaven offers extra convenience features just like those for keywords:
- When you use a project, MailMaven remembers it, so when you start typing project names in the future, matching terms are suggested automatically.
- Preferred projects are those you use most often, and when applying projects, you can filter the list to show only preferred projects if you like. To make newly added project names preferred by default, go to Settings > Tag > Projects and uncheck “Add New Projects to Preferred List as.”
- To edit preferred projects, add new projects (including multiple-word phrases), and set other project-related options (including a color for each project), go to Settings > Tag > Projects.
Once you’ve added a project to a message, you can see it below the message snippet in snippet view, in the message header area in the message pane/window, and in the Projects section of the Tag Mailboxes sidebar. Projects can also be used in defining rules and smart mailboxes, and as part of a search.
Importance
A message’s importance is a marker you set, indicating the level of importance (from 1–5) you assign to a message.
You can add an importance tag in any of these ways:
- Use the Importance section of the Tag window (see Using the Tag Window).
-
Choose Message > Set Set Importance and click the icon representing the level of importance you want.
- Right-click (or Control-click) a message and click the icon representing the level of importance you want from the contextual menu. Once you’ve assigned an importance to a message, you can see it below the message snippet in snippet view, in the message header area in the message pane/window, and in the Importance section of the Tag Mailboxes sidebar. Importance can also be used in defining rules and smart mailboxes, and as part of a search.
Review Date
A review date is a tag you add that tells you a future date on which you want to look at a particular message again.
You can add a review date in any of these ways:
- Use the Review Date section of the Tag window (see Using the Tag Window).
- Choose Message > Set Review Date (⌃⌘R).
- Right-click (or Control-click) a message and choose Set Review Date from the contextual menu.
In any of these places, you can:
- Choose a preset from the pop-up menu (such as “Friday” or “in 3 days”). You can customize these in Settings > Tag > Review.
- Click the calendar
 icon and select a date on the pop-up calendar.
 - Type a word or phrase, such as
TomorroworNext Thursday.
You can then monitor messages that may require review in the Review mailboxes (see Review Mailboxes) or regular Smart Mailboxes. Depending on your settings in Settings > Tag > Review, MailMaven can display a notification when a message’s review date arrives. Review dates can also be used as part of a search.
Expected Reply
You can tell MailMaven that you’re expecting a reply to a message by adding a special keyword (Pending by default) to a message you’re composing or one in a Sent mailbox. To change which keyword is used to mark a message as expecting a reply, or to set other parameters for expected replies, go to Settings > Tag > Review and look in the Expected Replies section.
Messages marked with that keyword appear in the Expecting Reply category under Review mailboxes (see Review Mailboxes).
Background Color
A background color tag lets you apply a color to messages to help you keep visual track of those in certain categories.
You can add a color in any of these ways:
- Use the Background Color section of the Tag window (see Using the Tag Window).
- Choose Message > Set Background Color and click the icon representing the color you want.
- Right-click (or Control-click) a message and click the icon representing the color you want from the contextual menu.
By default, the color you apply appears as a bar to the left of the message in message lists and to the left of the header in the message pane/window. However, you can also display it as a background color (as the name implies) in message lists by going to Settings > Tag > Colors and choosing Background from the Message List Color Location pop-up menu.
Notes
A note is just that: extra information about a message you add for your own future reference.
You can add a note in any of these ways:
- Use the Notes section of the Tag window (see Using the Tag Window)
- Choose Message > Set Note (⌃⌘N)
- Right-click (or Control-click) a message and choose Set Note from the contextual menu.
Notes appear below the snippet in Snippet view, and in the message header area in the message pane/window, and can be used as part of a search.
Alternate Subject
An alternate subject is the subject you think a message should have, not necessarily what the sender thought it should have!
You can add an alternate subject in any of these ways:
- Use the Alternate Subject section of the Tag window (see Using the Tag Window).
- Choose Message > Set Alternate Subject (⌃⌘S).
- Right-click (or Control-click) a message and choose Set Alternate Subject from the contextual menu.
When you do this, MailMaven shows your subject in the Subject header throughout the app.
Flag
A flag is an icon in the shape of a flag that can be in any of seven colors. When you want to quickly make certain messages stand out in a mailbox without using specific keywords, a flag is a good option. A given message can have only one flag color.
You can add a flag in any of these ways:
- Use the Flag section of the Tag window (see Using the Tag Window).
- Choose Message > Set Flag and click the icon representing the flag you want.
- Right-click (or Control-click) a message and click the icon representing the flag you want.
Once you’ve added a flat to a message, you can see it below the message snippet in snippet view, in the message header area in the message pane/window, and in the Flags section of the Tag Mailboxes sidebar. It can also be used in defining rules and smart mailboxes, and as part of a search.
Tags and Gmail Labels
In general, Gmail labels are equivalent to MailMaven keywords. For example, any messages in your Gmail account in MailMaven should be tagged with keywords representing whatever labels are applied in Gmail.
However, there are several qualifications due to the differences in how Gmail treats labels (via IMAP) and how MailMaven handles keyword tags:
- Keywords can be specific to MailMaven (the default), Universal (applying both to MailMaven and to Gmail), or Gmail-specific. To make sure any newly created keywords in MailMaven can be used as Gmail labels, go to Settings > Tag > Keywords and choose Universal Keyword/Label from the “Add New Keywords to Preferred List as” pop-up menu. Or, to change a particular keyword to be universal, double-click in in the list, select Universal Keyword/Label, and click Save.
- MailMaven uses a subtle styling change to differentiate MailMaven-only keywords from those that can be used with Gmail. MailMaven-only labels have rounded corners and a light blue background (snow), while Gmail labels have square corners and a darker blue background (fog).
- When you’re sending a message from your Gmail account within MailMaven, any keywords you add to that message that are either universal or Gmail-specific should appear on the Sent message on the Gmail site as labels. Similarly, if you add a universal or Gmail-specific keyword/label to any existing message in your Gmail account, it should appear in your Gmail account as a label.
- In order for MailMaven to be able to “see” a label applied in Gmail, that label must be visible via IMAP. To check this, sign in to your Gmail account in a browser. Click the settings
 icon > See all settings > Labels. At the bottom of the list, under the Labels heading, every Gmail label that you want MailMaven to be able to see should have Show in IMAP checked.
 - If you add a Gmail label to a message from a non-Gmail account, it behaves as a regular keyword.
- You can’t delete Gmail labels from with MailMaven, though you can select the Muted checkbox in Settings > Tag > Keywords to hide them. If you want to delete a Gmail label completely, you must do that on the Gmail site.
-
Message Organization