Get to Know MailMaven
The Main Window
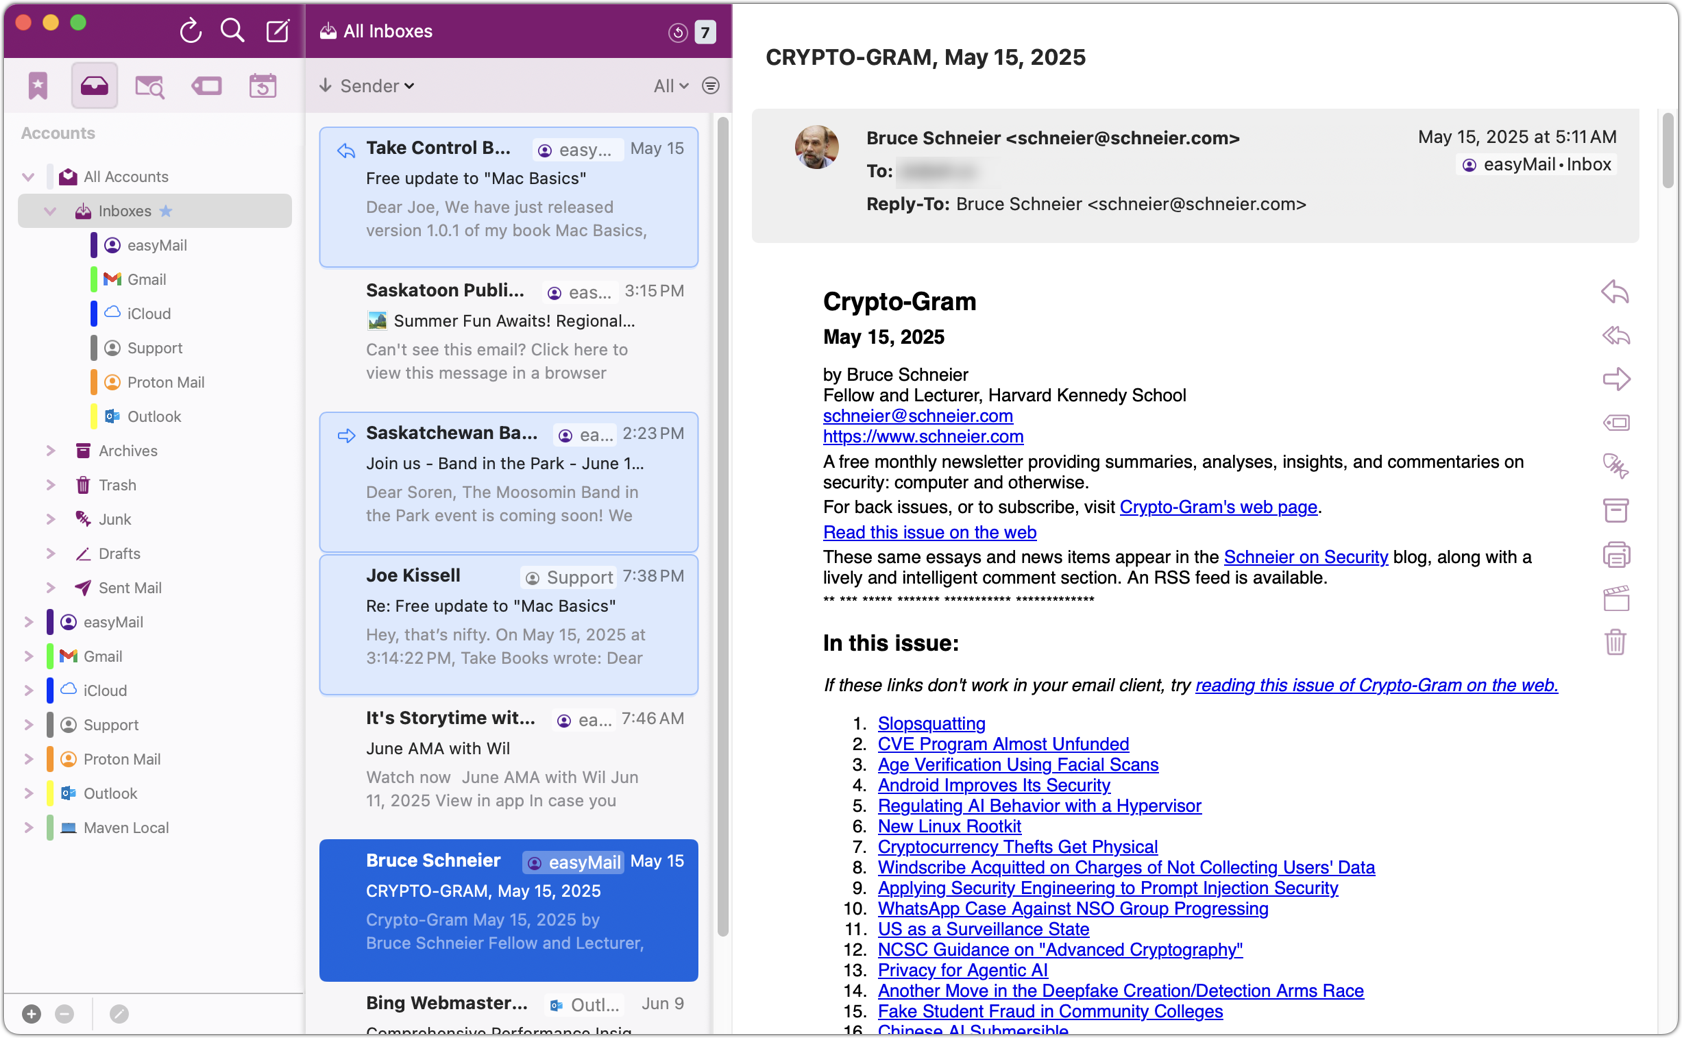
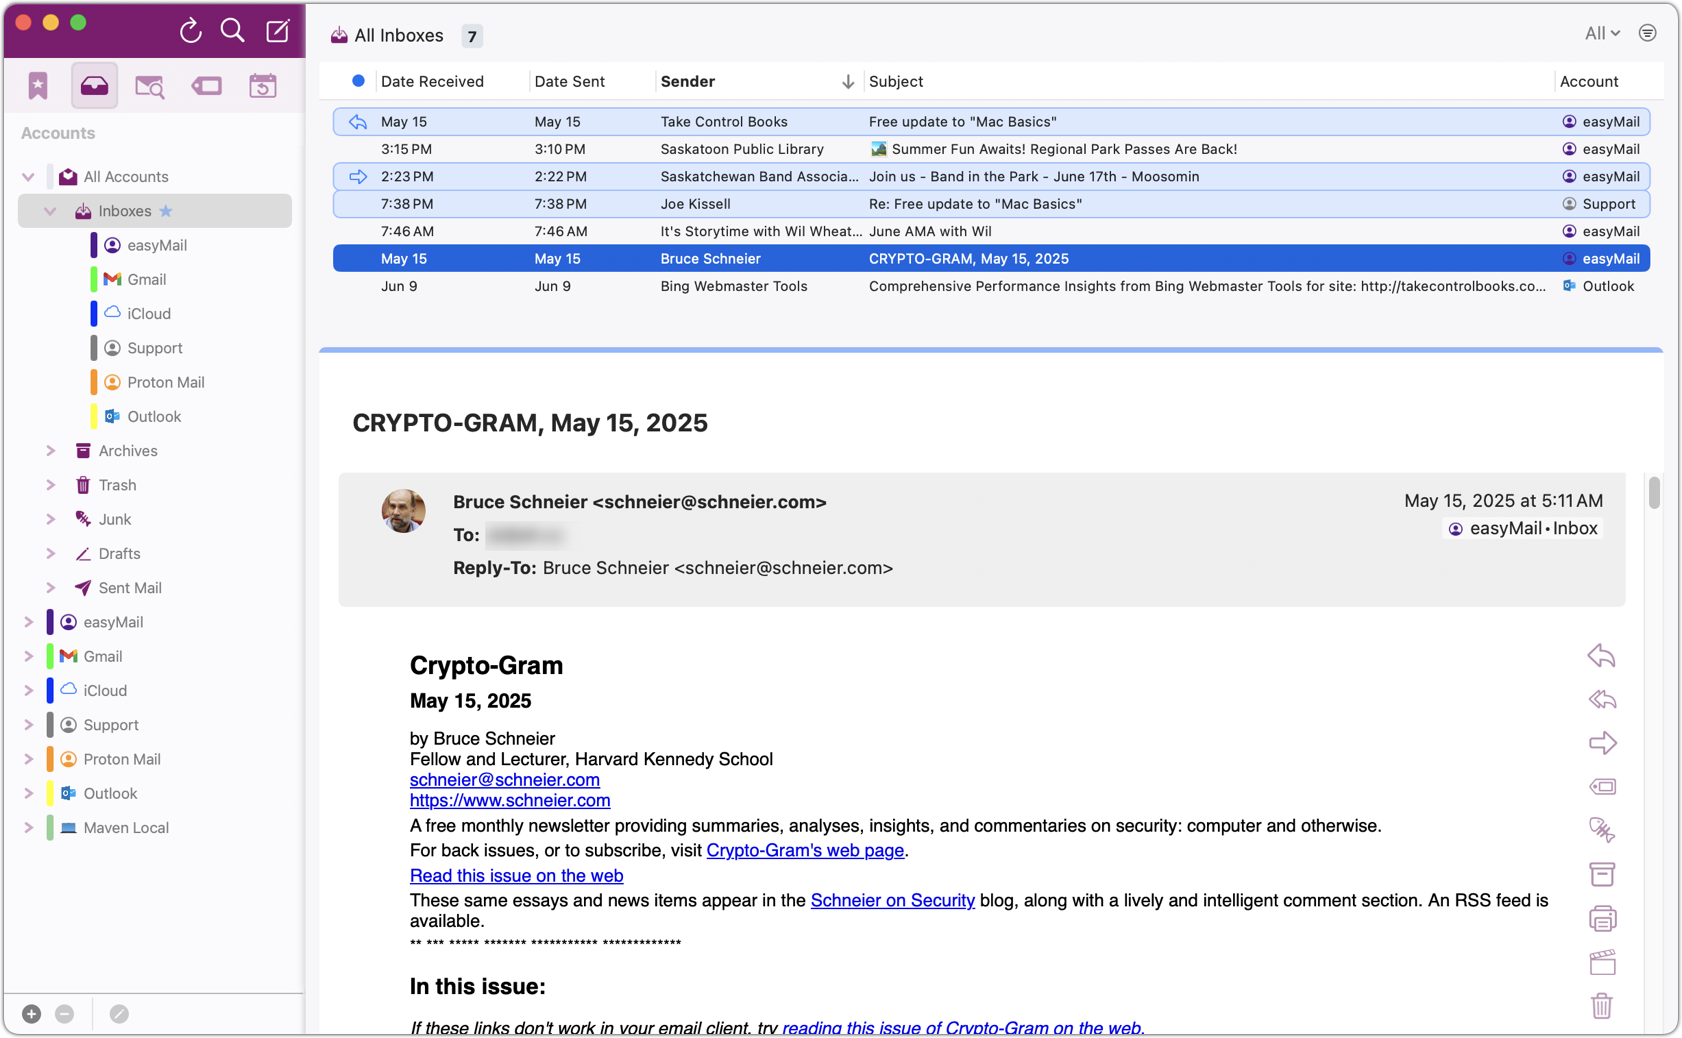
MailMaven’s main window, the viewer window, is where you’ll spend most of your time. It’s where you see your mailboxes, messages, and other controls for managing your email.
The viewer window is divided into three main sections (the sidebar; the message list, which also has special controls for navigating conversations; and the message pane). See the following pages for details:
Sidebar
On the left side of the main MailMaven window is the Sidebar, which provides navigational tools. This is your starting point for finding your way around the mailboxes, tags, and other organizational features in MailMaven.
Sidebar Categories
The Sidebar offers five different views that you can switch among by clicking the icons at the top. If you’re ever lost, try the Account Mailboxes ![]() view, where you can find the Inbox and other mailboxes for each of your accounts.
view, where you can find the Inbox and other mailboxes for each of your accounts.
Account Mailboxes
Click Account Mailboxes ![]() to show the mailboxes for all your accounts. Each account has its own Inbox, along with other standard mailboxes such as Archive, Trash, Junk, Drafts, and Sent Messages and any user-created mailboxes. (To add or remove accounts, go to Settings > Accounts Settings.)
to show the mailboxes for all your accounts. Each account has its own Inbox, along with other standard mailboxes such as Archive, Trash, Junk, Drafts, and Sent Messages and any user-created mailboxes. (To add or remove accounts, go to Settings > Accounts Settings.)
Besides account-specific mailboxes, the All Accounts portion of the sidebar displays group Inboxes, Archives, Trash, Junk, Drafts, and Sent Mail for all your accounts, so you can see these mailboxes for all your accounts together in one place.
You may also see a Maven Local entry in the Sidebar, which contains mailboxes stored only on your Mac and not in any online account.
To collapse or expand the mailboxes within any account or category, click the disclosure arrow ( or
or  ) to its left.
Favorites
Click Favorites ![]() to display all the items you’ve marked as favorites. If you have large numbers of mailboxes, tags, and other organizational elements, selecting your most commonly visited spots as favorites can help you navigate to them more quickly.
to display all the items you’ve marked as favorites. If you have large numbers of mailboxes, tags, and other organizational elements, selecting your most commonly visited spots as favorites can help you navigate to them more quickly.
You can favorite any account, mailbox, smart mailbox, tag, tag category, or review mailbox in three ways:
- Control-click (or right-click) it and choose Add to Favorites.
- Drag it to the Favorites
 icon at the top of the Sidebar, then drag down to the specific spot where you want it to appear.
 - Click the plus
 icon at the bottom of the Favorites list and choose a predefined Favorite Group from the pop-up menu.
Mailboxes you’ve marked as favorites display a small star ![]() icon in their original location.
icon in their original location.
In addition to the Favorite Groups shown when you click the plus ![]() icon, such as Smart Mailboxes and Recent Mailboxes, you can create your own Favorite Groups to further organize your Favorites. To create a custom Favorite Group, click the plus
icon, such as Smart Mailboxes and Recent Mailboxes, you can create your own Favorite Groups to further organize your Favorites. To create a custom Favorite Group, click the plus ![]() icon and choose Add Favorite Group. Type a name for the group, optionally select a color, and if you to see all the messages in that group when you select it, also check “Display messages of member mailboxes.” Click OK. You can then drag any existing Favorites into that group.
icon and choose Add Favorite Group. Type a name for the group, optionally select a color, and if you to see all the messages in that group when you select it, also check “Display messages of member mailboxes.” Click OK. You can then drag any existing Favorites into that group.
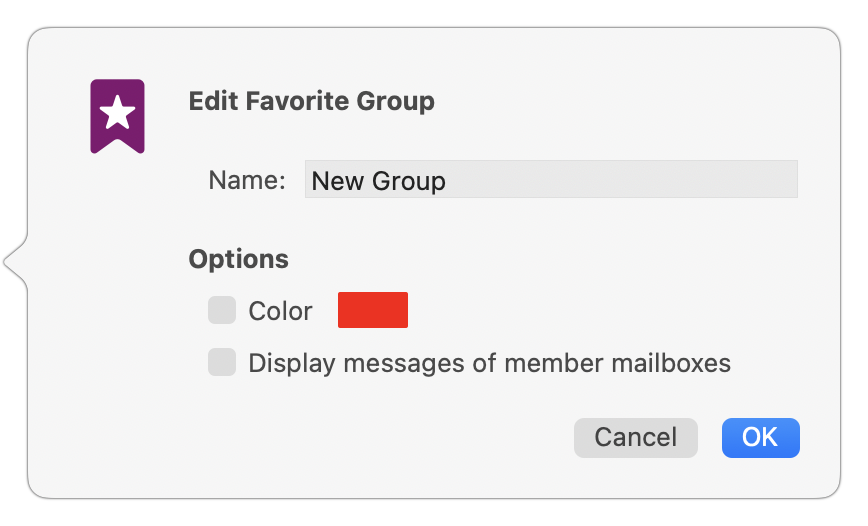
To edit any Favorite or Favorite Group, either select it and click the Edit ![]() icon at the bottom, Control-click (or right-click) it and choose Edit Favorite, or (in the case of custom Favorite Groups) double-click it . You can then change the name, color, and message display as shown above.
icon at the bottom, Control-click (or right-click) it and choose Edit Favorite, or (in the case of custom Favorite Groups) double-click it . You can then change the name, color, and message display as shown above.
Smart Mailboxes
Click Smart Mailboxes ![]() to display a list of smart mailboxes you’ve created. A smart mailbox is essentially a saved search; every time you select it, it shows an up-to-date list of messages matching the criteria you set.
to display a list of smart mailboxes you’ve created. A smart mailbox is essentially a saved search; every time you select it, it shows an up-to-date list of messages matching the criteria you set.
To create a smart mailbox, do either of the following:
- Choose Mailbox > New Smart Mailbox.
- Click the plus icon at the bottom of the Smart Mailboxes list.
- Select an existing smart mailbox and click the Duplicate
 icon to copy it as a starting point for a new one.
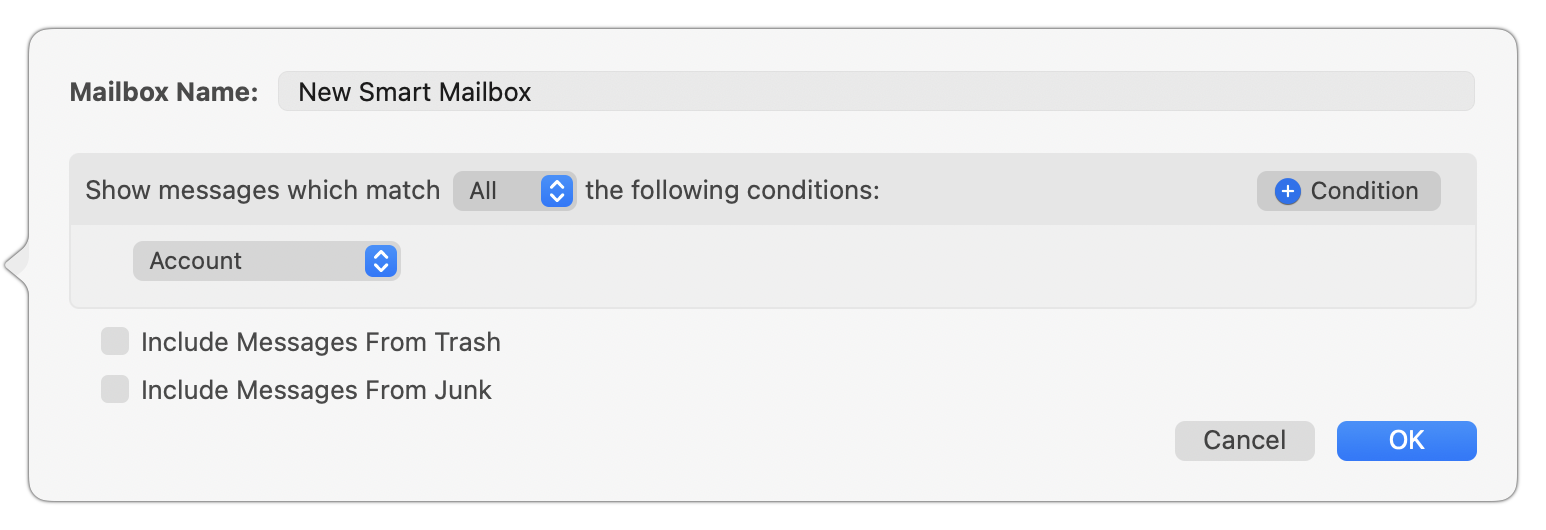
In the popover that appears, specify the condition(s) that must be met for a message to be included in the list. The interface and conditions are almost identical to those for rules (refer to Rules), except that there are no actions associated with smart mailboxes; the implicit action is to display a list of matching messages.
You can edit a smart mailbox later by double-clicking it.
Tag Mailboxes
Click Tags ![]() to display tag mailboxes—that is, mailboxes for your user-defined keywords and projects, plus Importance and Flags. To learn about how to add these tags to your messages, see the following topics:
to display tag mailboxes—that is, mailboxes for your user-defined keywords and projects, plus Importance and Flags. To learn about how to add these tags to your messages, see the following topics:
- Tagging Messages (for general information on tagging)
- Tag Types (to learn about the numerous types of tags)
- Adding Tags (for tagging outgoing messages manually)
- Applying Tags with Rules (for tagging messages automatically)
Review Mailboxes
Click Review Mailboxes ![]() to display special mailboxes with messages that may require your review—for example, because you set a review date that’s today, tomorrow, or in the past; you’re expecting a reply; or the message arrived recently and is still unread. For ways to apply these tags, see Adding Tags, Setting Delivery Options, and Tag Settings.
to display special mailboxes with messages that may require your review—for example, because you set a review date that’s today, tomorrow, or in the past; you’re expecting a reply; or the message arrived recently and is still unread. For ways to apply these tags, see Adding Tags, Setting Delivery Options, and Tag Settings.
The available review mailboxes are as follows:
- Unread: The unread messages from all mailboxes
- Review: Messages tagged for review in some way:
- Review Today: Messages with a review date of today
- Review Tomorrow: Messages with a review date of tomorrow
- Past Due: Messages whose review date is in the past
- Upcoming: By default, messages whose review date is two or three days in the future
- Future: By default, messages whose review date is three or more days in the future
- Expecting Reply: Messages—usually sent messages—to which you’ve applied the Pending Keyword (“Pending” by default); see Review Tab
- Tag Conflicts: Messages for which there are two or more sets of tags that don’t match, often as a result of changing tags on a message on two different Macs, one of which is offline at the time
- Recent: Messages received in one of the following time frames:
- Today
- Yesterday
- This Week
- Last Week
- This Month
Message List
To the right of the sidebar in the main MailMaven window is the message list, which is just that: a list of messages in whichever account, mailbox, or other category is currently selected in the sidebar. Click a message to display its contents and interact with it; for more detail about the message contents, see Message Pane/Window.
MailMaven provides extensive control over what shows up in the message list and how it appears.
View Options
The message list can appear as a vertical column (Snippets, the default) or a horizontal pane (Table). Switch to table view by choosing View > Show Message List as Table; switch to snippet view by choosing View > Show Message List as Snippets.
In snippet view, you can adjust how many lines of the message body appear under the title, from 0–4 lines, in Settings > View > Appearance > Viewer Layout by choosing the desired length from the Snippet Length pop-up menu.
You can also choose which tags to display in the message list (in snippet view only) by using commands on the View menu, such as Show Keywords, Show Review Date, and Show Importance.
Unread/Total Icons
At the very top of the window above the message list you’ll see one or two numbers ![]() . The rightmost number indicates the total number of messages in the selected mailbox. The number of unread messages, if any, is shown to the left of that with a blue dot in the corner. (If you see only one number, that’s the total number of messages.)
. The rightmost number indicates the total number of messages in the selected mailbox. The number of unread messages, if any, is shown to the left of that with a blue dot in the corner. (If you see only one number, that’s the total number of messages.)
Click the unread count to filter the list to show only unread messages; click the total number to reset the list to include all messages.
Sort/Group Controls
The message list can sort messages by any of numerous criteria, such as Date Received (the default) or Date Sent, Sender, Size, and the presence of attachments. To change the sort criterion, choose the one you want from the left-hand pop-up menu above the message list. To change the sort direction, choose Ascending or Descending from that pop-up menu; the arrow (![]() or
or ![]() ) shows the current direction.
) shows the current direction.
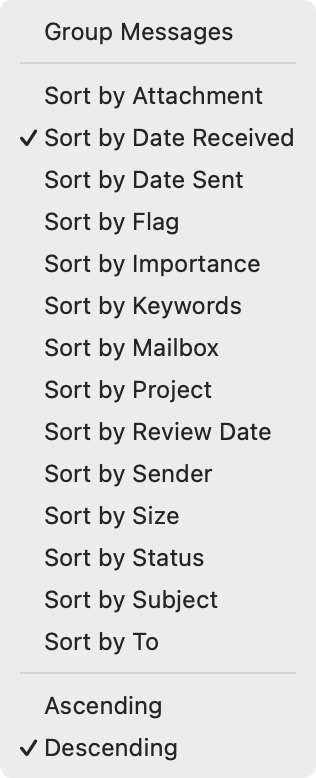
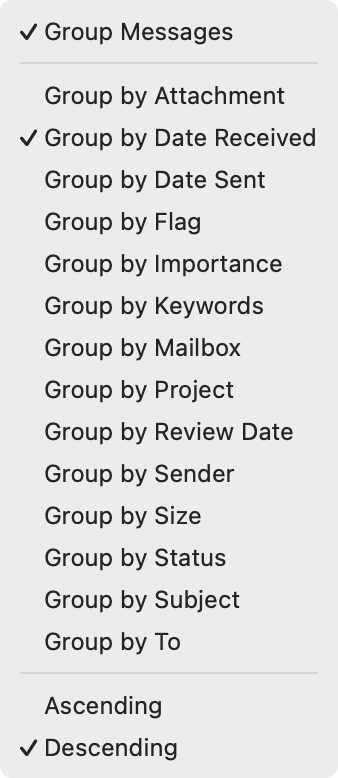
Besides sorting your messages, you can also group them under headings indicating their relative status. For example, grouping messages by Date Received may have labels for “Received Today,” “Received This Week,” and Received current month,” while grouping by attachments might have headings like “7 Attachments,” “1 Attachment,” and “No Attachments.”
To switch from regular sorting to sorting with grouping, choose Group Messages from the pop-up menu. All the menu commands then change from “Sort by” to “Group by.”
Filter Controls
An optional filter temporarily reduces the number of messages shown in the list according to criteria you specify—for example, only unread messages or those for which you were a Cc recipient.
To filter the current message list, choose the criterion you want, such as Unread or Tagged, from the pop-up menu next to the Filter ![]() icon at the top of the message list.
icon at the top of the message list.

If you choose Phrase, a Filter field appears, along with a pop-up menu next to the Filter ![]() icon. Initially, that pop-up menu is set to Phrase, meaning you can type a word or phrase into the Filter field and MailMaven filters the currently shown message list to include only messages with that text in the message (including the headers and body).
icon. Initially, that pop-up menu is set to Phrase, meaning you can type a word or phrase into the Filter field and MailMaven filters the currently shown message list to include only messages with that text in the message (including the headers and body).
Note, however, that the criteria on that menu are additive: you can filter by both a phrase and unread status, for example; to turn off any criterion, choose it from that pop-up message again.
To turn off filtering, choose All Messages from the pop-up menu.
Conversations
In MailMaven, a conversation is any set of two or more connected messages. The simplest conversation is a single message and its reply—for example, a message you sent and a reply to that message, or a message your received and your own reply. However, conversations can also be complex threads involving many participants over a long period of time, such as when you send a group email and various group members reply to you and to each other in extended exchanges. Forwarded messages are also parts of conversations.
MailMaven offers several tools to help you find your way through even the most complex conversations.
Grouping Messages by Conversation
Regardless of the message list’s current sort or grouping order (see Sort/Group Controls), you may want all the messages from the current mailbox that are part of the same conversation to appear together, making it easier to follow the conversation. To group messages for the current mailbox by conversation, choose View > Group Messages by Conversation. (If you do not have messages grouped by conversation but you do have conversations highlighted as described just ahead, selecting any message also highlights the other messages from that conversation in the current mailbox.)
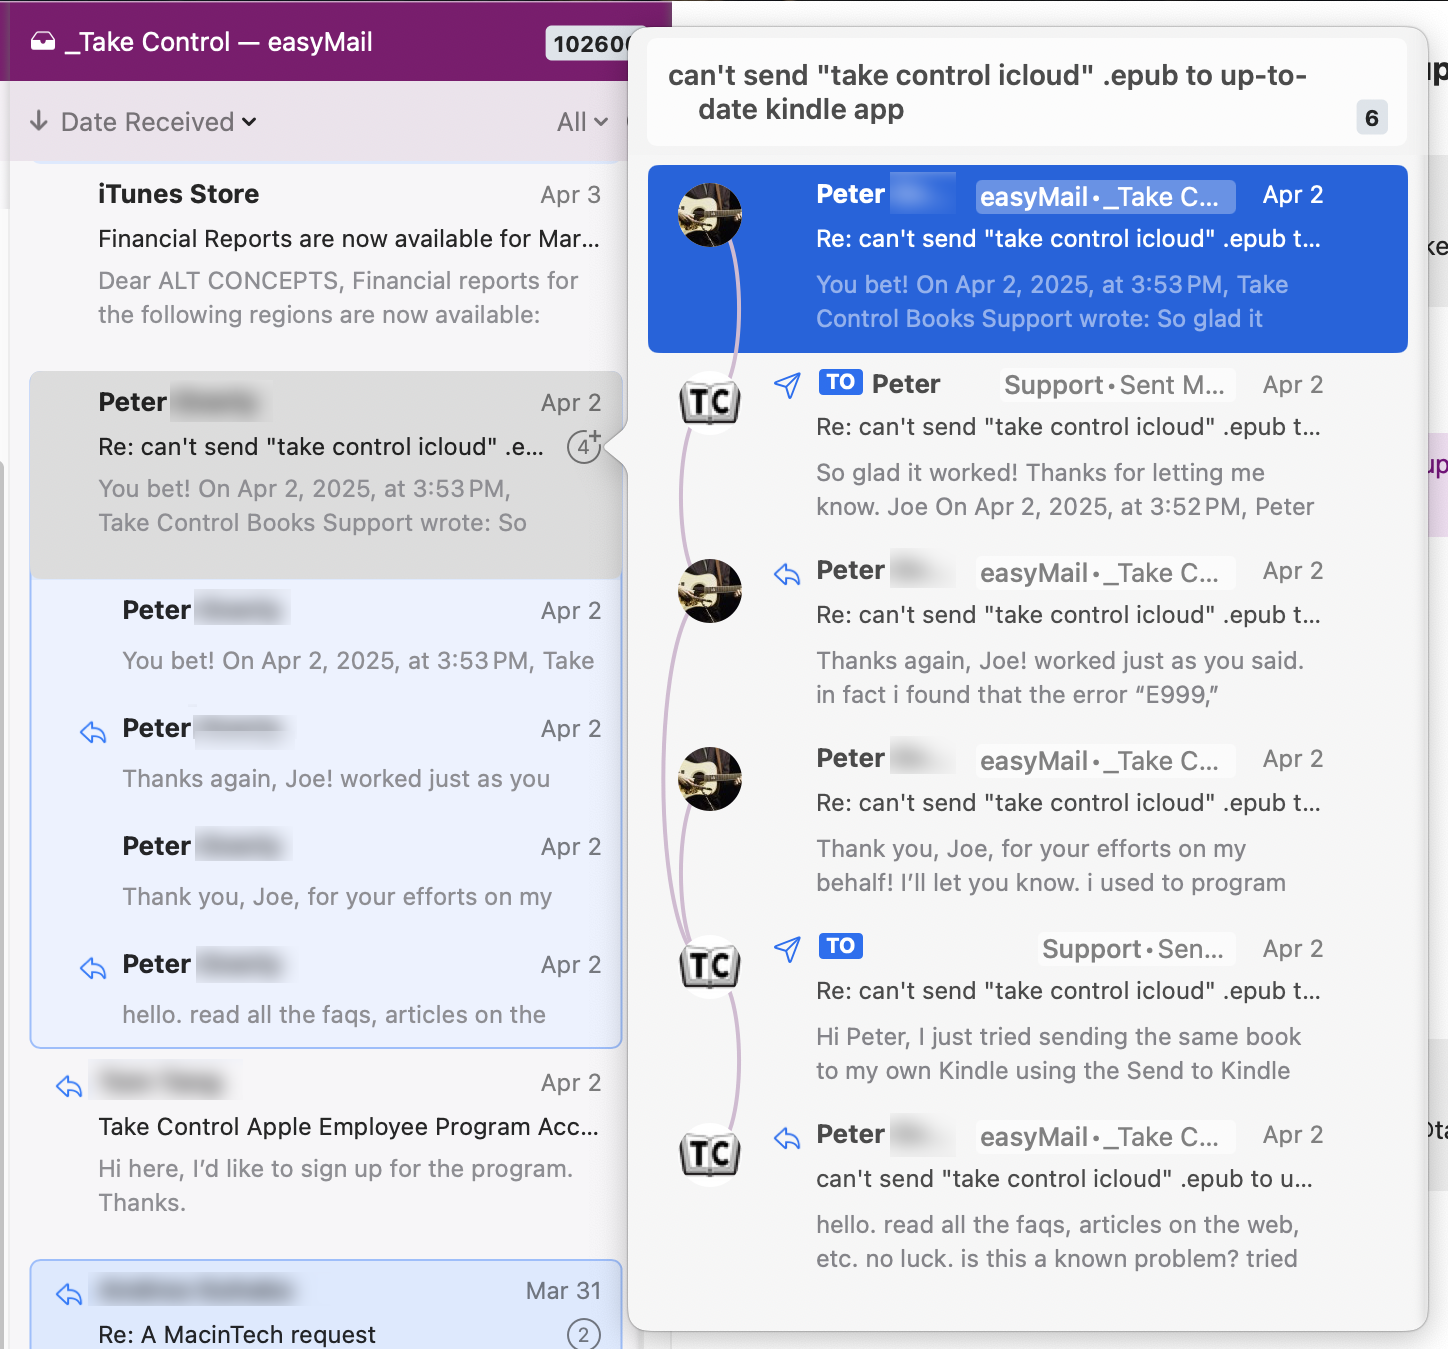
When messages are grouped by conversation, you’re in snippet view, and messages must are sorted by Date Received or Date Sent, a conversation ![]() icon appears on the right side of the group; the number in the circle indicates how many messages from the conversation are in the currently selected mailbox. A plus (+) icon in the upper-right corner of the conversation icon indicates that there are more messages from the conversation in other mailboxes.
icon appears on the right side of the group; the number in the circle indicates how many messages from the conversation are in the currently selected mailbox. A plus (+) icon in the upper-right corner of the conversation icon indicates that there are more messages from the conversation in other mailboxes.
To expand or collapse a single conversation in the message list, regardless of whether you’re in snippet view or table view, press the right arrow ▶︎ or left arrow ◀︎, respectively. In snippet view only, you can also click the conversation ![]() icon to toggle the display of additional messages from the conversation in the current mailbox.
icon to toggle the display of additional messages from the conversation in the current mailbox.
Highlighting Conversations
By default, MailMaven’s message list displays a blue background for every message that’s part of a conversation, even if the other message(s) aren’t in the same mailbox (see Conversations). If you prefer not to see that highlighting, you can turn it off by choosing View > Highlight Conversations.
Using the Conversation Map
MailMaven’s conversation map is a list of all the messages in a conversation, with connecting lines showing which messages were replied to and by whom. Because conversations (especially those involving several people) can branch out in nonlinear ways, a conversation map helps you keep track of the flow of information among parties. You can display the conversation map either in a popover or in a separate floating panel, as you prefer.
To display the conversation popover momentarily (just to glance at the conversation), click and hold the conversation ![]() icon or the Conversation Map
icon or the Conversation Map ![]() icon at the top of the message preview. The popover appears only as long as you hold down the mouse button.
icon at the top of the message preview. The popover appears only as long as you hold down the mouse button.
To make the popover stay open, instead right-click (or Control-click) the conversation ![]() icon or click the Conversation Map
icon or click the Conversation Map ![]() icon at the top of the message preview.
icon at the top of the message preview.
To display the floating conversation panel, select a message from the conversation and choose View > Show Conversation Panel (⌘-‘) or right-click/Control-click the conversation ![]() icon.
icon.
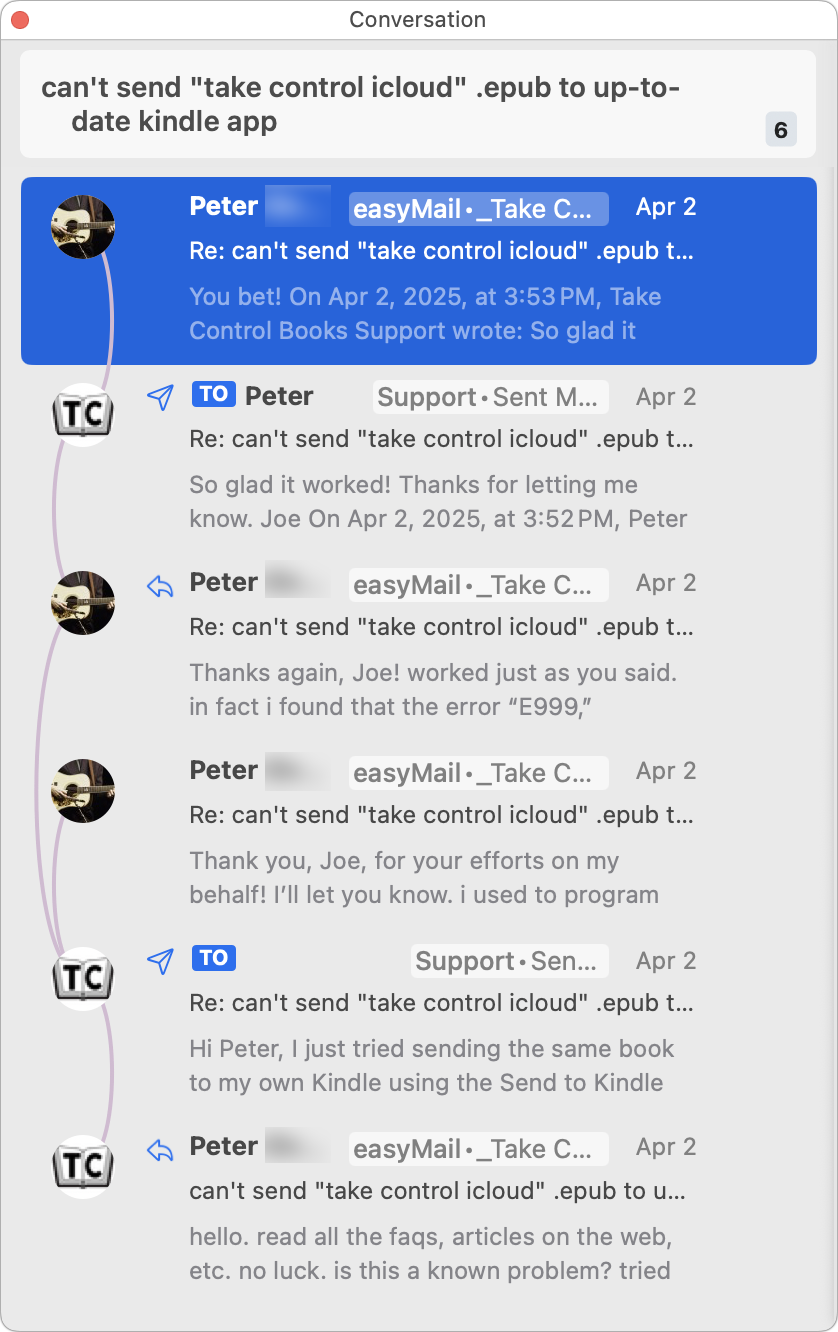
When the conversation map is visible, click any message in it to jump to that message; double-click it to open it in a new window. Unread and total message counts appear at the top of the conversation map, just as in the main message list.
Message Pane/Window
The message pane occupies the largest portion of the main MailMaven window, displaying the contents of the message along with its headers, any attachments, and various controls for working with the message. If you prefer to open a message in a separate window, you can double-click it in the message list or choose Message > View in New Window (⌘O). The appearance and controls are the same in both cases.
Subject
The message subject appears at the very top of the window. If the message is part of a conversation, details about the conversation appear below the subject (such as “4 Messages in Conversation, 0 Unread”).

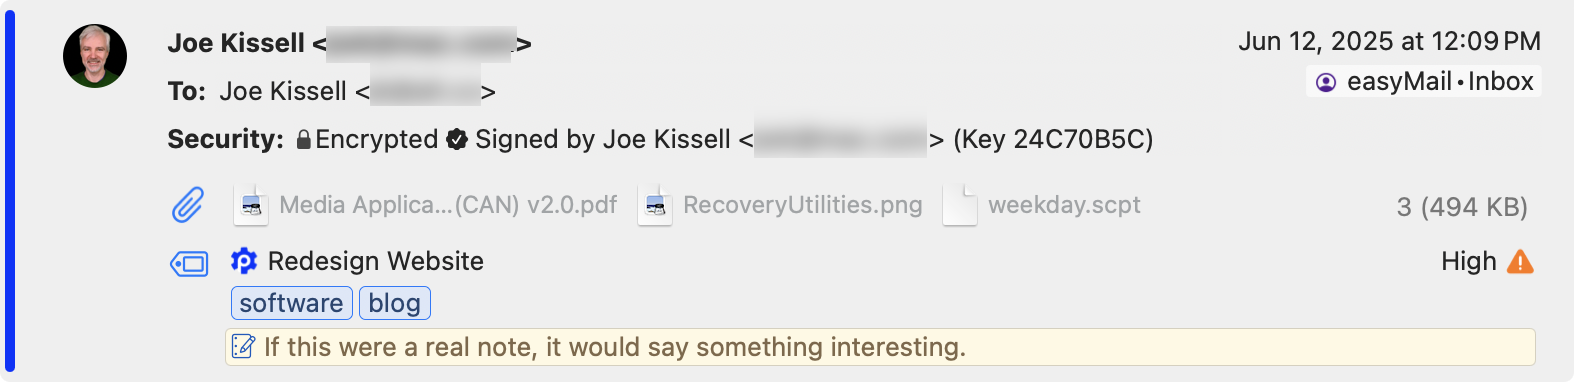
Message Header
The message header area is a gray box below the subject that shows:
- The sender’s name and address
- The date and time the message was received
- The name(s) and address(es) of the recipient(s), including any Cc recipients
- The sender’s original subject, if you’ve changed it using Alternate Subject
- The mailbox the message is in, along with an icon representing its account
- For messages that have been encrypted and/or digitally signed, a Security line with additional information (see Encrypting and Digitally Signing Messages)
- A list of attachments, if any, along with their total size; see Attachments, ahead
- Tags you’ve added, such as Keywords, Notes, and Project.
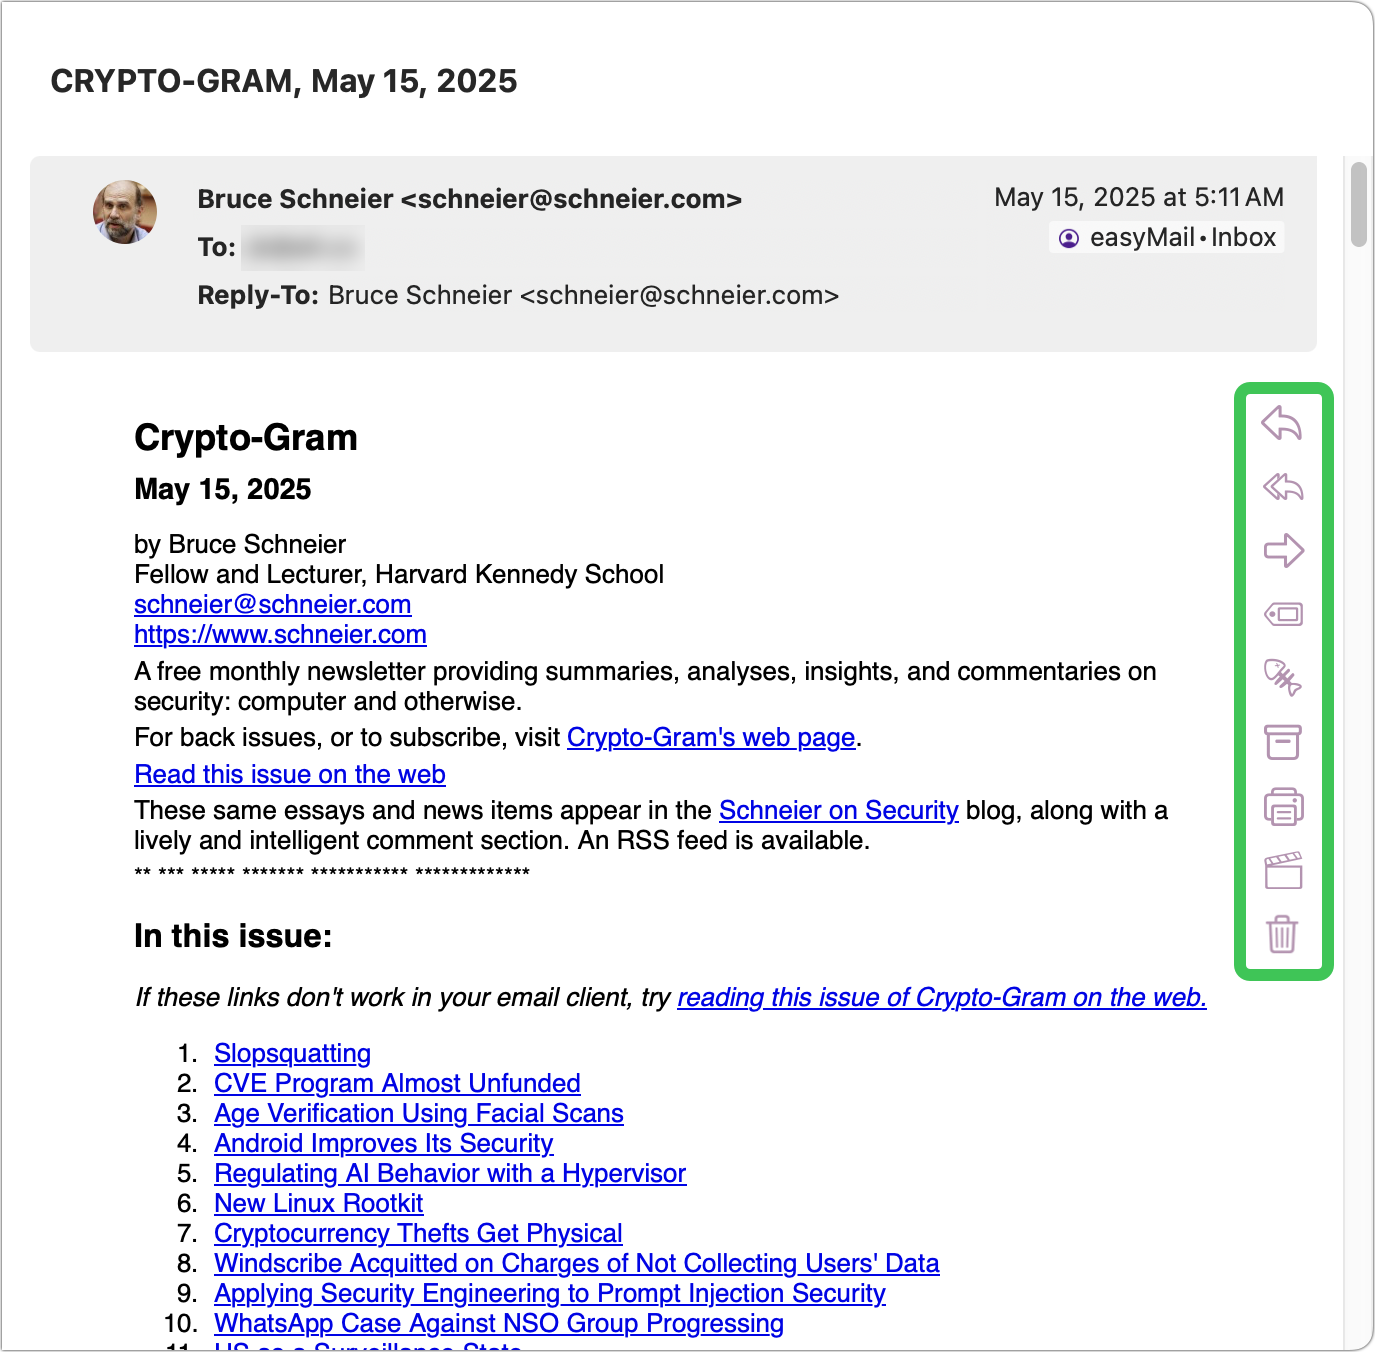
Remote Content Control
If the message contains images or other media that must be downloaded to be displayed, a banner appears below the message header saying “This message contains remote content.” By default, MailMaven does not display this material because downloading media can signal to the sender not only that you’ve read the message but also when you did so and where you’re located. However, if you want to load the media, click the Load Remote Content button, which loads the material just once.

You can also click the arrow on the right side of the control and choose Load Once (for the same effect), Always Load For This Message (which remembers the setting for this particular message), or Always Load For This Sender (which loads the remote content for all messages from the same address).

Note that MailMaven does load remote content from people in your Contacts, but you can disable this (or extend it to everyone) by going to Settings > View > Message Display > Images and either deselecting Load Remote Media or choosing Everyone from the From pop-up menu, respectively.
Attachments
Message attachments appear next to the attachment icon in the message header. If a message has more attachments than can fit in a single row, click the ellipsis ![]() icon to display the rest below.
icon to display the rest below.

You can select an attachment icon and press the Space bar to preview it with Quick Look, double-click it to open it in its default app (such as Preview), or drag it to your desktop or another window to save it outside MailMaven.
Most attachments also appear in the body of the message, though whether this happens depends on the sender’s email app and how the message was formatted. Clicking or double-clicking an attachment in the body of the message works as in the message header, and drag-and-drop usually works.
Non-graphical attachments, including PDFs, generally appear at the bottom of the message in a gray box. You can either drag the icon in this box or click the Save ![]() icon to choose a destination on your Mac to save the file.
icon to choose a destination on your Mac to save the file.

Basic Message Controls
MailMaven offers the usual array of controls for working with messages, such as replying, forwarding, and deleting, plus a wide range of tagging features. In most cases, you can accomplish any of these tasks by using icons, menu commands, or keyboard shortcuts.
By default, a group of icons called the Message Action Bar appears to the right of the message content; these controls act only on that particular message. If you prefer, you can move this to the left or top by going to Settings > View > Message Display > Message Action Bar and choosing Left or Top from the Location pop-up menu; you can also use the Visibility pop-up menu to control whether the bar is always visible or if it appears only when your mouse pointer is inside the message.
The controls on the Message Action Bar and their corresponding menu commands and keyboard shortcuts are:
- Reply
 : Message > Reply (⌘R)
 - Reply All
 : Message > Reply All
 - Forward
 : Message > Forward (⌥⌘F)
 - Tag Message
 : For individual messages, this icon is equivalent to Message > Set Tags (⌃⌘T). However, note that if the message is part of a conversation, Message > Set Tags (⌃⌘T) applies to the entire conversation (see Conversation Controls, below).
 - Mark as Junk
 : Message > Mark as Junk (⌘J)
 - Archive Message
 : Message > Archive (⌃⌘A)
 - Print Message
 : File > Print (⌘P)
 - Action
 : By default, this icon applies keystroke rules (Message > Apply Keystroke Rules, F2). However, you can configure it to show the Action Panel (F1) or the Move to Mailbox panel (Message > Move to Mailbox, F3) by going to Settings > View > Message Display > Message Action Bar and choosing a command from the Action pop-up menu.
 - Delete Message
 : Message > Delete (Delete). This command moves the selected message(s) to the Trash mailbox.
Conversation Controls
If a message is part of a conversation (see Conversations), an additional block of conversation controls called the Conversation Action Bar appears to the right of the subject. These icons apply to every message in the conversation.

The controls on the Conversation Action Bar and their corresponding menu commands and keyboard shortcuts are:
- Conversation Map
 : View > Show Conversation Panel (⌘-‘), except that this icon displays the conversation map in a popover, whereas the menu command and keyboard shortcut display it in a floating panel
 - Tag All Messages : Message > Set Tags (⌃⌘T)
- Archive Conversation : Message > Archive (⌃⌘A)
- Print Conversation : File > Print (⌘P)
- Action : By default, this icon applies keystroke rules (Message > Apply Keystroke Rules, F2). However, you can configure it to show the Action Panel (F1) or the Move to Mailbox panel (Message > Move to Mailbox, F3) by going to Settings > View > Message Display > Message Action Bar and choosing a command from the Action pop-up menu.
- Delete Conversation : Message > Delete (Delete). This command moves all the messages in the conversation to the Trash mailbox.